
Navigating the Business Portal
The VoIP Business Portal (BP), also known simply as the Voice Portal, allows Customer Administrators and Group Administrators management of their telephony service from anywhere through a graphical interface that is simple to navigate.
Important:
The Business Portal is an extremely powerful tool for setting up and managing your VoIP telephony service. Incorrect use of the tool may cause significant operational issues for VoIP users. For this reason, access is not routinely given to customers. However, in exceptional circumstances, Cloud Direct may arrange customer access to the Business Portal, provided the customer first undergoes a short training course. Please contact your account manager for further details.
Getting started
Caution:
You must access the VoIP Business Portal using Internet Explorer, in compatibility mode!
Do Not use Firefox, Chrome, or other internet browsers.
Failure to do this may not be noticeable initially, but will result in errors and failures when attempting to make future changes.
To login to the Business Portal proceed as follows.
- Open Internet Explorer in compatibility mode, and browse to www.clouddirect.net/voiceportal to access the Login page.
- Fill in the fields Username, Company Domain and Password shown below.
- Click Login to log in to the Business Portal.
Note:
When a Company administrator logs in, the Business Portal opens at the Companies area.
When a Group administrator logs in, the Business Portal opens at the Sites, Site Selection or Employees area depending on whether the administered Group is also a Site.
To logout of the Business Portal, simply select the Logout button on the top right hand corner. This button is visible at all times when logged in.

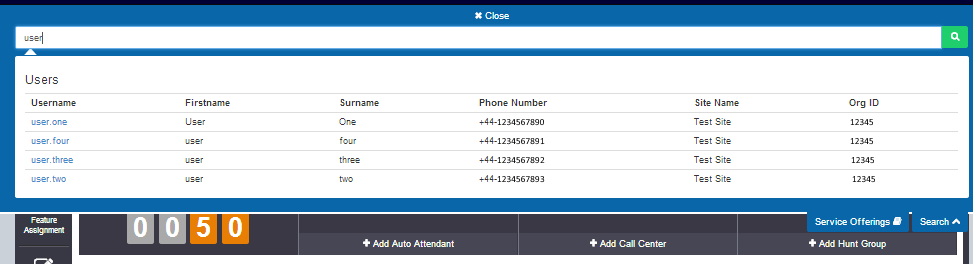
Using Search Tab (live search) and Filtering
The Search Tab is located at the top right hand side of the Business Portal once a Company has been selected. It offers a dynamic search facility across a number of fields
- Username
- Firstname
- Surname
- Phone Number
- Site Name
Type in your criteria (full or partial) and it will list all matches.
Some screens have filter options which allow you to dynamically filter the options displayed on the screen
Additionally the Site selection, Employees Selection and Group Selection pages have search options which allow you search the relevant data.
- Site Selection:
- Site Name
- Group Selection:
- Group Name
- Employee Selection:
- Username
- Firstname
- Surname
- Phone Number
- Site Name

Navigating the Companies tab
Company administrators can use the top navigation tabs to manage Sites, Employees and Employee Groups. The side navigation tabs provide you with administration and management options within the selected Company, Site, Employee or Employee Groups.
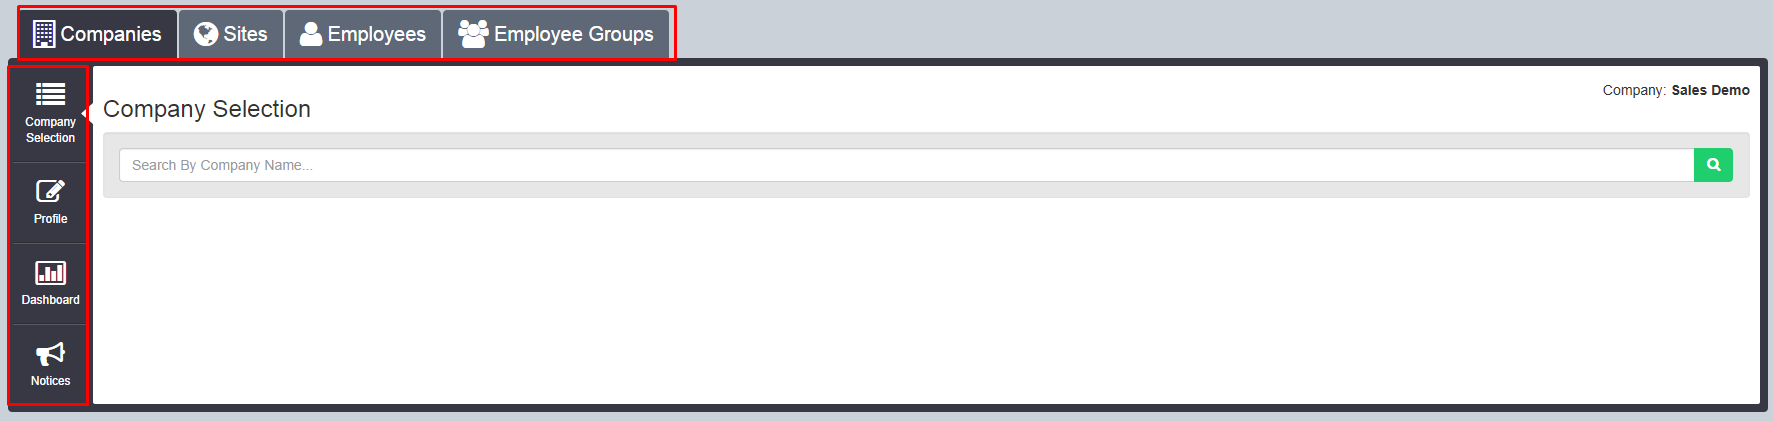
Company selection
- On the Companies tab, in the Company Selection page, find the required company by entering the first few letters of the company name in the search box, then clicking
 .
.
Note:
Clicking without entering anything in the search box will bring up a complete list of all companies.
The required company can then be selected from the list. This method is not recommended if there is a large list of companies.
- With a Company selected from within the Companies tab, the following additional side navigation tabs become available;Select the required company by clicking Select.
|
Side navigation tab |
Select this tab to… |
|
Profile |
View and amend contact details and other information for the Company. |
|
Dashboard (Company level) |
View active Sites, Employees, Administrators, and the Recent Activity of users within the Company. Add Employees. Analyse Call Logs, and configure Service Suspensions. |
|
Notices |
View and create messages to customer groups (Alerts, News, Maintenance etc) |
Note also the Service Offerings and Search buttons now appear in the top right corner of the window.
The Search function is described later in this article. The Service Offerings menu lists the Feature Packages that are available for Sites and Employees. A Feature Package represents a specific collection of service features. You can use this information to determine which Feature Package you want to assign to each Employee within your Company.
Navigating the Sites tab
Site Selection
When logged into the Business Portal and, if appropriate, having selected a Company, then:
- Select the Sites tab.
The Site List page opens within the Site Selection tab.

- Click to display a list of sites within the company.
- Click Select to select the required site
With a site selected, the following additional side navigation tabs become available:
|
Side navigation tab |
Select this tab to… |
|
Features |
View and configure Site Features such as Call Groups (Auto Attendants, Hunt Groups, Call Centres), Contacts, Call Management (Calling plans, Call Capacity Management and Group Calling Line ID) and Portals & Bridges. |
|
Feature Assignment
|
Assign or disable Site Features that are included in the Site's Feature Package |
|
Profile
|
View the details associated to the Site. For example, telephone number ranges, Call Capacity Groups, and Shared Devices etc. |
|
Device Management
|
Add, modify and delete Devices and apply customisations. |
|
Dashboard
|
View numbers of Site Employees and limits to numbers. Access Call Logging, Disaster Recovery features and a Site Feature Summary |
Navigating the Employees tab
Employees can log in and manage their own features and passwords. However an administrator can do the same, as well as administer the Employee's Service Settings to manage their Telephone Number, Feature Package, Device etc.
When logged in to the Business Portal and, if appropriate, having selected a Company, then:
- Select the Employees tab.
The Employee Selection page opens within the Employee Selection tab.

- Click to display a list of employees within the company. These are listed in pages of up to 20 employees each.
- Click Select to select the required employee.
With an employee selected from within the Employees tab, the following additional side navigation tabs become available:
|
Side navigation tab |
Select this tab to… |
|
Add Employee |
'Add' new Employees. |
|
Profile |
View address details, administrative privileges (role) and change portal passwords. |
|
Service Settings
|
For Service Settings (Feature Packs and Add-ons, DDI, etc.) and for resetting Employee Passwords for Voice Portal Pin (numbers only) and Applications. |
|
Features |
Manage Employee features. |
|
Feature Assignment |
View and manage the features that have been assigned to the Employee. |
|
Devices
|
For a list of the Employee's associated devices (Primary and additional Shared Call Appearance Devices) and to add new devices for the Employee. |
|
Applications |
View or download Applications, or change Application passwords. |
|
Group Memberships |
View and manage which groups the employee is a member of. |
|
Dashboard (Employee level) |
View Call history, Voicemail summary and Call Logging. Configure most commonly used features, such as Do Not Disturb or Call Forward Always. |
|
Import Employee |
Import an external list of Employees via a CSV (comma separated values) template. |
Navigating the Employee Groups tab
As a Company administrator, you can use the Business Portal to create a hierarchy of Groups for organizing your Company's Employee accounts. Each Group you create can act as a container for other Groups, for specific sets of Employee accounts, or both. You can build a multi-level Group hierarchy by creating one or more "top-level" Groups, and then by adding "sub-Groups" within this top-level Group. Once you have created a Group hierarchy, you can assign Employees to specific Groups or create additional Groups as required.
When you start to manage your Company's hierarchy of Groups and user accounts, you will notice that some Group/s have already been created. These Group/s represent your Company and its geographic location, specifically, the Company Site/s at which the service can be activated. These Groups are created by your service provider during the service sign-up process and appear as top-level Groups.
As a Company administrator, you cannot create Company Site-specific Groups. You can view the Site-specific Groups that your service provider has created, modify their properties, and assign administrators to them, just like you can with any Groups you create. Unlike the Groups you create, however, when you assign a Group administrator to a Group that represents Site, you give this user the ability to configure service features that apply to the Site as a whole.
When logged in to the Business Portal and, if appropriate, having selected a Company, then:
- Select the Employee Groups tab.
The Group Selection page opens within the Employee Groups tab.

- Click to display a list of Employee Groups within the company.
- Click Select to select the required Group.
When the Employee Groups tab is selected, the following side navigation tabs become available;
|
Side navigation tab |
Select this tab to… |
|
Group Selection |
View, manage or delete a Group. |
|
Add Group |
'Add' new Groups. |
|
Profile |
View and amend contact details and other information for the Group. |
|
Group Admins |
Assign an Employee as a Group administrator to a Group or Site. You would give this Employee the ability to create, manage, and delete user accounts, sub-groups, and service activations within the Group. |
|
Group Memberships |
Assign Employees to Groups. |
|
Import Groups |
Import an external group, for example "Sales", via a CSV (comma separated values) or XML template. |
