
Navigating the Call Recorder Portal
The Call Recorder Portal allows Users of the system to manage calls by number. Users are assigned numbers by which they are then able to manage calls in progress and recorded calls, and view and playback calls that belong to them. And, if applicable, the user is also able to download their recorded call files, via FTP.
This article is quite long so, if you know which section you wish to read, please use the links below to access quickly.
Logging On
To access the application, you must first logon with a user name and password. The user name is assigned by the Group Administrator that created them in the End User Interface. Passwords for new users are auto-generated by the application, and emailed directly to you. Once you have access to the application, you have the ability to change your password using the Change Password link. You are then able to select a password of your choice.
To access the Call Recorder portal:
- Open an Internet browser session.
Supported browsers include the following and should be HTML 5 compliant:
- Microsoft Internet Explorer
- Firefox
- Google Chrome
- Safari
The latest version and one version prior are supported for each browser.
- Enter the Call Recorder Login URL https://callrecorder.yourservices.co.uk/CallRecorder/Login/
The Call Recorder Log On window opens.
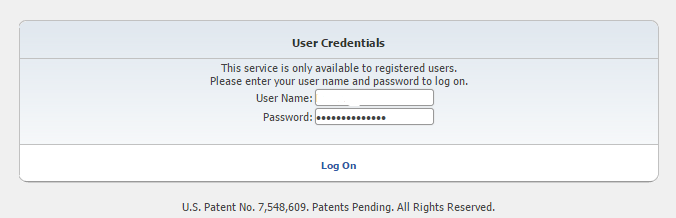
- Enter your User Name and Password.
- Click Logon.
The Call Recorder portal opens at the Home tab, or dashboard. There are four tabs in total that may be selected:

- Home (dashboard)
- Recordings
- Reports
- Alerts.
These four tabs are described briefly below.
The Home Tab (Dashboard)
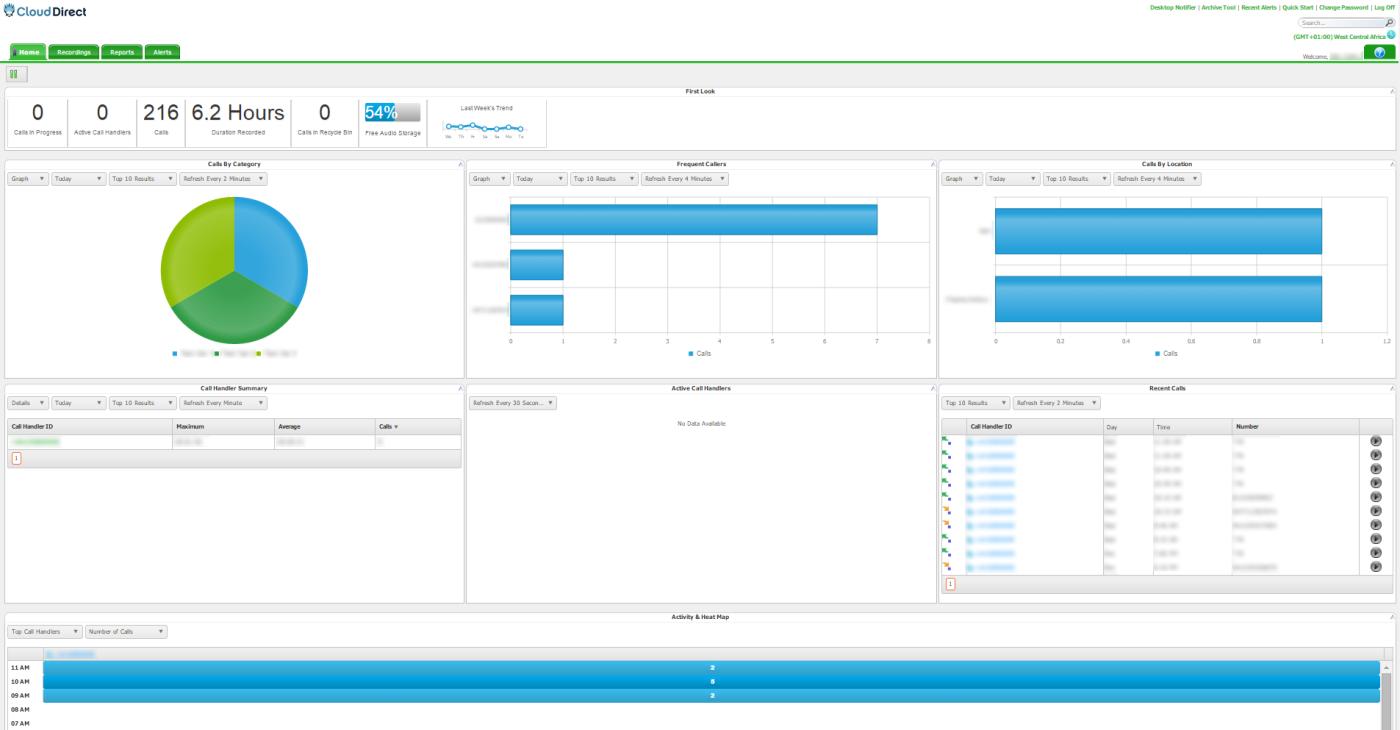
The Call Recorder Home tab, or Dashboard, provides you with a real-time view of the system data including information about the total number of calls in progress, active call handlers, calls, duration recorded, calls in the recycle bin, free audio storage, free screen storage, etc. The Dashboard is divided into eight distinctive panes that give you a pictorial and data overview of your company's current call usage. The eight panes are:
- First Look
- Calls by Category
- Frequent Callers
- Calls by Location
- Call Handler Summary
- Active Call Handlers
- Recent Calls
- Activity & Heat Map
Where applicable, the panes can be viewed as data or as graphs. Additionally, the panes can be reorganized or relocated by clicking on a pane, dragging it, and dropping it in the desired location on the Dashboard. Each pane can also be collapsed by clicking on the arrow in upper right corner of the applicable pane.
With the exception of First Look, Active Call Handlers, Recent Calls, and Activity & Heat Map charts, you have the ability to view each pane as either a text or graphical display. Additionally, all panes have one field you can click on to drill down into the details of that information or play a call recording. The default is for the Dashboard to refresh every 30 seconds; however, you can reset the refresh value for each element individually except for the First Look pane. Refresh can be temporarily stopped by clicking the 
The eight panes of the Call Recorder are described below.
First Look
The First Look pane appears horizontally across the top of the Dashboard and displays a quick view of totals for the following information:
- Calls in Progress – identifies the total number of calls in the system that are not terminated, by Group and/or User.
- Active Call Handlers – displays the total number of extensions with an active call. Active Call Handlers displays information by Group and then by User. Groups and Users will only see information based on extensions to which they have access.
- Calls – identifies the total number of completed calls for the user that is currently logged in and that have a recording associated with them. This value is accumulative over the lifetime of the Group. However, the number will adjust accordingly when call files are deleted and/or routinely swept from the application.
- Duration Recorded – identifies the sum of duration for recorded calls that have a recording associated with them, by Group and User. This value is accumulative over the lifetime of the Group.
- Calls in Recycle Bin – identifies the total number of calls that have a recording associated with them and that are pending deletion. This value is accumulative over the lifetime of the Group. However, the number will adjust accordingly when call files are deleted and/or routinely swept from the application.
- Free Audio Storage – identifies the total amount of free audio storage, by Group only.
- Free Video Storage – identifies the total amount of free video storage, by Group only.
- Last Week's Trend – provides a visual display of the call history for the previous week.
Calls by Category
The Calls by Category pane displays total calls by custom category. Categories are specific to the user. The calls included in the totals are determined by the applied filter (for example: Last 30 Days, Last Month, Year to Date, etc.). The Calls by Category pane can be displayed as text or a graph by selecting Details or Graph from the drop down list. You can drill down into the specific recorded calls by clicking on a specific category. Additionally, you are able to adjust the number of results to display by selecting the applicable number from the Top Results drop down list.
Frequent Callers
The Frequent Callers pane displays the total number of calls by calling number for the most frequently called numbers. The Frequent Callers chart displays inbound calls only. The number of frequent callers displayed in the pane will be determined by the applied filter (for example: Last 30 Days, Last Month, Year to Date, etc.). The Frequent Callers pane can be displayed as text or a graph by selecting Details or Graph from the drop down list. You can drill down into the specific recorded calls by clicking on a specific frequent caller. Additionally, you are able to adjust the number of results to display by selecting the applicable number from the Top Results drop down list.
Calls by Location
The Calls by Location pane displays total calls by each location as determined by the NPA/NXX. The calls included in the totals will be determined by the applied filter (for example: Last 30 Days, Last Month, Year to Date, etc.). The Calls by Location pane can be displayed as text or as a pie chart by clicking on the View Graph link. You can drill down into the specific recorded calls by clicking on a location under the Location column. Additionally, you are able to adjust the number of results to display by selecting the applicable number from the Top Results drop down list.
Call Handler Summary
The Call Handler Summary pane displays the maximum duration, average duration, and total number of calls by call handler/number for the duration determined by the applied filter (for example: Last 30 Days, Last Month, Year to Date, etc.). The Call Handler Summary pane can be displayed as text or as a pie chart by clicking on the View Graph link. You can drill down into the specific recorded calls by clicking on a call handler ID under the Call Handler ID column. Additionally, you are able to adjust the number of results to display by selecting the applicable number from the Top Results drop down list.
Active Call Handlers
The Active Call Handlers pane displays the call handlers/numbers that are currently on calls and the number of the other party. Users that have access are able to monitor an active call handler's call in progress by clicking on the monitor button. Additionally, you are able to adjust the number of results to display by selecting the applicable number from the Top Results drop down list.
Recent Calls
The Recent Calls pane displays the most recent calls, incoming and outgoing, by call handler. The number of recent calls displayed in the pane will be determined by the applied filter (for example: Last 30 Days, Last Month, Year to Date, etc.). The Recent Calls pane can be displayed as text or a graph by selecting Details or Graph from the drop down list. You can play a recorded call by clicking on the recorded call icon. Additionally, you are able to adjust the number of results to display by selecting the applicable number from the Top Results drop down list.
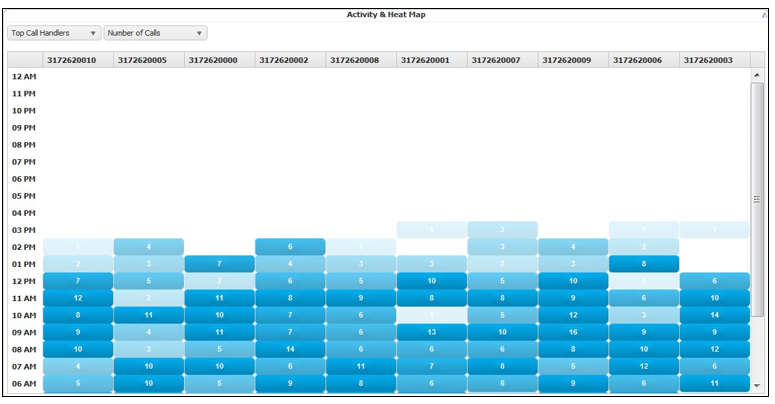
Activity & Heat Map
The Activity & Heat Map displays the call activity for the top 10 numbers by hourly intervals over a 24 hour period. The Activity & Heat Map can be filtered by Call Handlers, Calling Parties, or Called Parties. Additionally, the call activity can be displayed as Number of Calls or Call Duration (in minutes). The darker coloured blocks represent the higher volume call activity while the lighter coloured blocks represent the lower volume call activity. Each individual colour block is clickable and will take you directly to the Recorded Calls tab where are you able to view the call activity, listen to the recording, add a comment, etc.
Recordings
The Recordings tab contains two options: Recorded Calls and Calls in Progress. These are described briefly below.
Recorded Calls
When logged in as the Group Administrator, the Recorded Calls screen displays all completed recorded calls for all Users. However, when logged in as an End User, you are only able to see completed recorded calls that belong to you or your user ID.
In order to better manage this screen, all column headers can be sorted by clicking on the applicable column header. Click once to sort the column in ascending order and click one more time to sort the column in descending order. The following information is displayed on the Recorded Calls screen:
- Number – the number or description associated with the call
- Day – the day of the week the call took place
- Date – the actual date the call took place
- Time – the time the call originated
- From Number – the originating number
- From Caller ID – displays the name or number of the person that originated the call, if caller ID is available
- To Number – the terminating number
- To Caller ID – displays the name or number of the To Number, if caller ID is available
- Redirected From – displays the number of the person or group transferring the call
- Redirected To – displays the number to which the call was transferred
- Duration – the length of the call
- Recording – identifies whether or not there is a recording associated with the call
- Annotate – comments and markers on calls to indicate where in the call a notable event occurred
- CRM – allows the user to upload recorded calls to an interfaced CRM systems such as Sugar and Salesforce.com through the standard API
- Email – allows the user to email a recorded call
- Comments – any comments associated with the call
- Category – allows the user to categorize calls into areas unique to their business (for example: geographic region or customer satisfaction)
- MD5 – identifies whether or not the call has been hashed using MD5 fingerprinting, thus ensuring that the call has not been tampered with and satisfying regulatory requirements
- Archive - allows you to view the file path of a particular recorded call
- Evaluate – allows Group Administrators to select individual recorded calls and evaluate the call handler's performance during the call
- Audio Mining – allows users to view the results of the audio mining pack search.
Note:
All columns on the Recorded Calls tab may not be available to you depending on what features your Group Administrator was assigned in the Administrative Interface.
Further information regarding the content of these columns is available below.
Number
When numbers are assigned to Users, the default setting is to record and retain all calls that are made from or to those numbers. This setting can be changed by the Group Administrator to not retain recordings. If the default setting has been preserved for a number, and calls are being recorded and retained, a  (Recordings button) will appear under the Recording column indicating there is a recorded call file for that particular call. To listen to the recorded call file, click on the Recordings button. Your default media player will open and begin playing the recorded call file (MP4 file). Please be aware that the way in which media players load and play the recorded call files will vary. For instance, QuickTime Player and Windows Media® Player will immediately launch the recorded call file. However, iTunes® will load the recorded call file in the library and you will have to click play to begin listening to the file.
Note:
Group Administrators will see recorded calls for all numbers assigned to Users they have created.
Annotate
Annotations allow you to add comments and markers to specific parts of calls to indicate where in the call a notable event might have occurred. For example: a contact centre manager (or any other user) can find a notable event in a call and mark it for future review with a comment. A  (Annotate (no)) button indicates there are currently no annotations associated with the corresponding recorded call file. However, a
  (Annotate) button indicates there are annotations associated with the recorded call file.
To add an annotation,
- Click on the Annotate button.
- Select the Play button to begin playing the recorded call.
- Select Pause when you come to the point in the call that you wish to add an annotation.
- Enter a subject marker description and any notes to better identify the annotation.
- Click Add Marker.
You can also attach external documents to an annotation by clicking Upload Document. You must repeat each step for each annotation you wish to add to the call.
Note:
Pausing or resuming a recording will automatically create an annotation for the call.
CRM
You have the option to upload recorded calls from the Recorded Calls tab to a CRM application. This functionality allows you to connect the recording system with CRM applications such as Sugar or Salesforce.com to upload recorded call files to specific contacts in the CRM application.
Note:
You can only have one active connection to a CRM application at a time. If you want to log into another CRM application, click CRM Client Settings, select the CRM application, and enter the credentials.
To upload a recorded call to a CRM,
- Select the CRM Client Settings link.
The CRM Client Settings link can be accessed from the toolbar on the Recorded Calls tab or from the Archive to CRM dialog box.
- Select the required CRM application from the drop down list.
- Enter or select the URL, username, and password to that CRM application.
- Click Test Connection.
A message is displayed notifying you if the connection was successful or failed. If the connection was successful,
- Click Save.
- Select the
 (CRM button) that corresponds to the call that you want to upload.
Note:
The number of the recorded call must be a number that belongs to at least one contact in the CRM application in order to perform the upload.
- If the contact, account, or case you want to upload the call to does not appear, then enter new criteria in the CRM Search field and click Search.
- If multiple contacts, accounts, or cases are returned, then deselect the ones you don't need by clicking in the option boxes to remove the checkmark.
- Enter a subject and a note about the recorded call file.
- Click Archive to CRM.
Additionally, situations will occur where you need to send a specific recorded call to a person that may not have access to the application or just for emphasis. In these instances, you have the ability to email the recorded call to that recipient. To send a recorded call file via email,
- Select the Email button that corresponds to the call that you want to send.
A new email page will open with the recorded call link displayed in the text area.
- Select your recipients, and send the email.
Note:
There will not be an email option for any calls that have been deleted. You will still see the call detail but there will not be a recording associated with it.
Comments
From the Recorded Calls screen you can also add comments to each of the recorded call files. A  (Add Comment button) indicates there are currently no comments associated with the corresponding recorded call file. A
  button indicates there are currently comments associated with the corresponding recorded call file. To add comments to a recorded call file,
- Click on the Add Comment button.
- Enter the applicable text in the text field.
- Click Submit.
This is the point at which the Add Comment button changes to the button.
Category
The ability to create categories for calls is beneficial to call handlers and managers, allowing them to categorize calls into areas unique to their business (for example: geographic region or customer satisfaction). You are then able to filter calls or run reports based upon these call categories. Click on the Category link and select the specific category from the drop down list.
Note:
Categories are specific to the user. Therefore, the categories that you create and assign to your recorded calls cannot be seen by other users.
Audio Mining
Once an audio mining pack has been added and released, and a filter has been applied, you have the ability to view the results of the filter and listen to the calls, if necessary. The application also rates the returned calls in order of confidence, or how sure the application is that the word or phrase is contained in the recording. To view the audio mining results, click the  button that corresponds to the recorded call for which you wish to view results.
MD5
MD5 is a technique used to ensure that a file has not been altered in any way. When the call is recorded, we take an MD5 hash of it, outputting a string of random characters. The point is that if MD5 fingerprinting is applied to the same call at a later point, it will create the same string of characters, unless the call file has changed. If a different string of characters that don't match the original is created, you know the call has been modified. The default is to hash all calls. Hovering your mouse over the MD5 icon for a specific call will reveal the hash string. If you have the recorded call file downloaded or available in another location, click on the MD5 icon to open the Verify Recording dialog box. Upload the recorded call file to verify the file has not been tampered with.
Archive
Clicking on specific  (Archive) button will display a list of ISO images that contain specific call recordings. The ISO image will identify the user that archived the call, the date and time, and the file path to where it was archived.
Number, Redirection, Date, Time, Category, or Other
Number, Redirection, Date, Time, Category, or Other (or a combination of all four) filters located below the Recorded Calls, Recycle Bin, Calls in Progress, and Reports navigation tabs can be applied to the screen to assist in searching and displaying only the information pertinent to your current needs. To select a filter to apply,
- Click on Filter.
- Select the Number, Redirection, Date, Time, Category, or Others tab(s).
- Enter or select the applicable information for each filter
- Click Apply Changes.
To return to the default information, click Reset All.
- Click Hide to close the Filter window.
Note:
You do not have the option to filter by category under the Reports tab.
Payment Card Industry Data Security Standard (PCI DSS)
The Payment Card Industry Data Security Standard (PCI DSS) is a set of requirements designed to ensure that all companies that process, store or transmit credit card information maintain a secure environment. Therefore, when a customer is set to read their credit card number over the phone, the PCI Compliance feature allows you to disable the call recorder briefly so that the credit card information is not recorded. At the time they begin to read their credit card number, you can enter a series of numbers on your touch pad to temporarily disable the recorder. Once they are done giving their credit card number you will re-enable the call recorder by entering the same numbers.
Calls in Progress
The Calls in Progress screen displays all calls that are currently taking place. There are several functions that can be performed from the Calls in Progress tab including screen and call recording on demand pause/resume; monitor, whisper, or barge calls; save recordings; and add notes and categories. In order to better manage Calls in Progress, all column headers can be sorted by clicking on the applicable column header. Click once to sort the column in ascending order and click one more time to sort the column in descending order. The following information is displayed on the Calls in Progress screen:
- Number – displays the number or description associated with the call.
- Day – displays the day of the week the call took place.
- Date – displays the actual date the call took place.
- Time – displays the time the call originated.
- From Number – displays the originating number.
- From Caller ID – identifies the name or number of the person that originated the call, if caller ID is available.
- To Number – displays the terminating number.
- To Caller ID – identifies the name or number of the To Number, if caller ID is available.
- Recording Status – displays whether or not a specific call is being call and/or screen recorded. If On Demand is identified as a trigger in an active Recording Policy, these buttons will also act as the Pause/Resume triggers for both call and screen recording.
- Monitor – if monitoring is available, a Monitor button is displayed for each call in progress. Monitoring allows the user to listen in on a call undetected by the other call participants.
- Whisper – if whisper is available, a Whisper button is displayed for each call in progress. Whisper allows the user to listen in on a call and actively participate with the call handler (selected number), but not to the other party on the call.
- Barge – if barge is available, a Barge button is displayed for each call in progress. Barge allows the user to actively participate in a call that is currently taking place and actively participate with both parties of the call.
- Save Recording – identifies whether or not the call is to be saved as a recorded call when it is complete. If all calls are set to be saved, the option box will appear disabled. If calls are not set to be saved, the option box will be enabled and the user can save a call on the fly by clicking in the option box while the call is still in progress.
- Screen Recording – identifies whether or not the screen recording functionality is available for this particular call. If screen recording is available, a check mark will appear.
- Comments – allows the user to add comments to associate with the call.
- Category – allows the user to categorize calls into areas unique to their business (for example: geographic region or customer satisfaction).
Note:
Monitor, Whisper, Barge, Screen Recording, Comments, and Category are features identified in the Administrative interface and allocated by Group and Extension. Some of these features may not be available if they were not allocated to the Group and/or Extension. Additionally, Recording Status and Screen Recording are features that are configured by Extension and may not be available or contain all possible functionality.
Recording Status
Recording status identifies whether or not calls in progress are being call and/or screen recorded. An Audio Recording button is displayed if the call in progress is being audio recorded. Similarly, a Screen Recording button is displayed in the same column if the call in progress is being screen recorded. Additionally, if On Demand is identified as a Pause and/or Resume trigger in an active Recording Policy, these buttons become interactive allowing the user to Pause and/or Resume the audio and/or screen recording. To Pause and/or Resume recording, click on the applicable Audio and/or Screen Recording button. When the recording is paused, the buttons will appear grey. When the recording is resumed or active, the buttons will appear green.
Note:
Pausing or resuming a recording will automatically create an annotation for the call.
Monitor, Whisper, and Barge
The Monitor, Whisper, and Barge functionality is useful in situations where training is needed for a new employee, behaviour issues have occurred or need to be monitored, or legal reasons. The benefit of this functionality is that, depending on which feature is being used, all or some of the participants are never aware that you are on the line. To monitor, whisper, or barge a call,
- Select the monitor, whisper, or barge button that corresponds to the specific call
- Enter the work number from which you will monitor, whisper, or barge the call.
- Click the Monitor, Whisper, or Barge link
The application will call the number that you entered and place you into the call.
- When you are done, simply hang up.
Note:
You must enter a valid number and cannot enter the To or From numbers. Additionally, the number that you enter must be registered to your server. The application will attempt to call the number but if it is not valid, it will essentially time out.
Save Recording
By default, all calls to and from a number are recorded and saved. The Group Administrator has the option to override this default in the Number Information screen by applying the Do Not Record feature. If you look at the Calls in Progress screen, you can identify which calls are recorded and saved on a regular basis, and which ones aren't. For the calls that aren't set up to be saved, you can, on a onetime-basis, save them on the fly by clicking in the Save Recording option box while the call is in progress.
Screen Recording
When numbers are assigned to Users, the default setting is to record all screen activity that is made from or to those numbers. This setting can be changed to do not record by the Group Administrator. If the default setting has been preserved for a number, a green checkmark will appear under the Screen Recording column on the Calls in Progress screen.
Comments
From the Calls in Progress screen you can also add comments to each of the calls. A (Add Comment button) indicates there are currently no comments associated with the corresponding calls in progress call file. A button indicates there are currently comments associated with the corresponding call file. To add comments to a call file, click on the Add Comment button and enter the applicable text in the text field. Click Submit to save your changes. This is the point at which the Add Comment button changes to the button.
Category
The ability to create categories for calls is beneficial to call handlers and managers because it allows them to categorize calls into areas unique to their business (for example: geographic region or customer satisfaction). You are then able to filter calls or run reports based upon these call categories. Click on the Category link and select the specific category from the drop down list.
Reports

There are eight reports included in the application that assist the user with administration activities. These are:
- Call Handler Activity
- Calling Locations
- Calls By Category
- Daily Usage
- Frequent Callers
- Hourly Usage
- Unused Numbers
- User Details
The reports identify information that can be found on the dashboard, or Home tab, but in more detail. Reports can be viewed as text or in a graphical format. You also have the ability to export reports and save them to your own PC. Additionally, you can filter on information in the reports such as number, date, and time. Further information on each report is given below.
Call Handler Activity report
The Call Handler Activity report displays the last 30 days of activity for each call handler in the application. The Call Handler Activity report can be displayed as text or as a pie chart by clicking on the Chart button found on the report toolbar. The report displays the number, description, total number of calls, average call duration, minimum duration, and maximum duration by call handler.
Calling Locations report
The Calling Locations report displays total calls by each location as determined by the NPA/NXX, for the last 30 days. The Calling Locations report can be displayed as text or as a pie chart by clicking on the Chart button found on the report toolbar. The report displays the number, location, and total number of calls made to that location.
Calls by Category report
The Calls by Category report displays total calls by custom category for the last 30 days. The Calls by Category report can be displayed as text or as a pie chart by clicking on the Chart button found on the report toolbar. The report displays total number of calls, average call duration, minimum duration, and maximum duration by category.
Daily Usage report
The Daily Usage report displays the activity totals for the day in the application. The Daily Usage report can be displayed as text or as a column chart by clicking on the Chart button found on the report toolbar. The report displays the date, total number of calls, average call duration, minimum duration, and maximum duration for the day.
Frequent Callers report
The Frequent Callers report displays the callers (by number) that have called the most frequently. The Frequent Callers pane can be displayed as text or as a bar chart by clicking on the Chart button found on the report toolbar. The report displays the number, the name associated with the number (caller ID), the total number of calls, average call duration, minimum duration, and maximum duration. The report is sorted in order of the most frequently called or dialled number.
Hourly Usage report
The Hourly Usage report displays a distribution of call activity across the hours of the day. The report can be displayed as text or as a column chart by clicking on the Chart button found on the report toolbar. The report displays the hour, total number of calls, average call duration, minimum duration, and maximum duration for each hour.
Unused Numbers report
The Unused Numbers report identifies numbers that have had no usage. The Unused Numbers report is text format only. The report displays the number and description.
User Details report
The User Details report identifies information about each user of the application. The User Details report is text format only. The report displays the username, email address, the date the user was created, the date the user last logged on to the application, the date the user's password was last changed, the total amount of numbers assigned to the user, total number of annotations and categories created by the user, and whether or not the user has permission to upload recorded calls to a CRM application.
Alerts
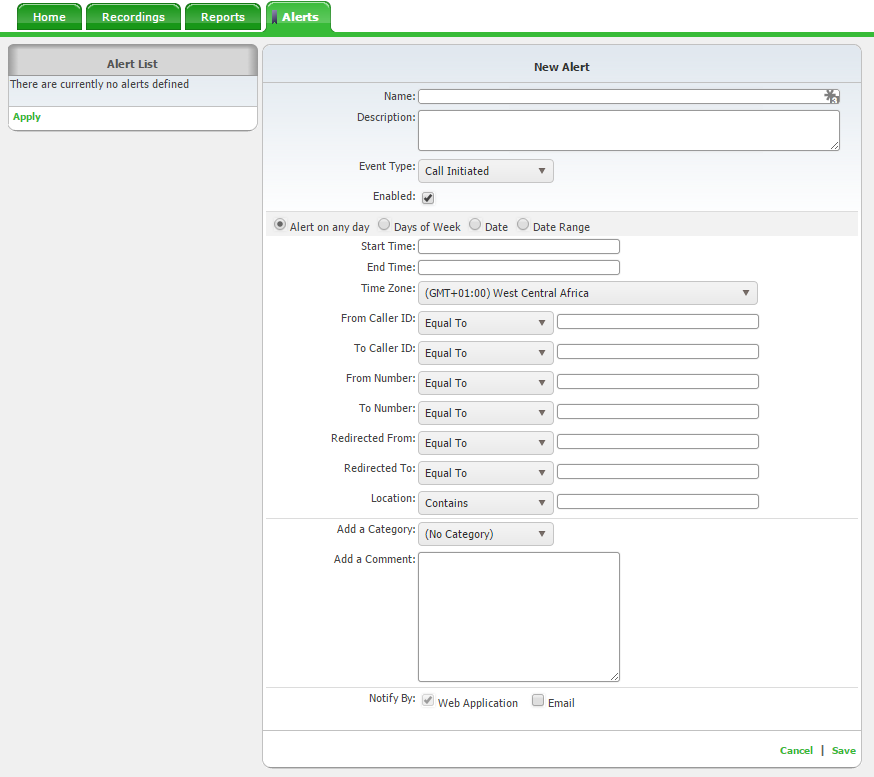
Do you wish that you could be alerted to any emergency, long duration, international, etc., calls made from within your organization? You can create Alerts based on specific call conditions. When those conditions are met, you will be notified with the pertinent details so that you can address any issues or make any necessary changes to current policies or procedures. Additionally, a history of the alerts that have executed is available from the Alerts tab. You can also view any recent alerts by clicking on the Recent Alerts link on the top right side of the End User Interface window.
Note:
Alerts will be temporarily disabled if they begin to cause excessive logging/emailing resulting in possible network congestion. In such cases, an email will be sent to the owner of the alert. Excessive logging/emailing is defined as greater than 1000 alerts per second.
To create an alert:
- Click New. Enter a name and brief description for the alert. The Alert name can be a maximum of 50 characters.
- Select the following: Event Type, whether or not the alert is enabled/disabled, and when the alert should run. Your input options will vary depending on your selection.
- Alert on any day - the alert will run every day that remains active.
- Days of Week - the options Monday, Tuesday, Wednesday, Thursday, Friday, Saturday, and Sunday will appear. Select the specific days the alert should run. The alert will run on the selected day(s) as long as it remains active.
- Date - Enter a specific call date. The alert will only run on this call date.
- Date Range - Enter a start and end date. The alert will only run during this date range.
Note:
You can select multiple criteria such as Days of the Week and a Date Range.
- Enter or select the following:
- Start Time - if applicable, select the start time the Alert should begin running on the selected day(s).
- End Time - if applicable, select the end time that the Alert should stop running on the selected day(s).
- Time Zone - select a time zone that you wish to apply to the alert.
- From Caller ID - defines the originating caller ID or partial originating caller ID on which to alert.
- To Caller ID - defines the terminating caller ID or partial terminating caller ID on which to alert.
- From Number - defines the originating number or partial originating number on which to alert.
- To Number - defines the dialed number or partial dialed number on which to alert.
- Redirected From – defines the number of the person or group transferring the call.
- Redirected To – defines the number to which the call was transferred.
- Location - defines the location or partial location on which to report.
- DTMF Digits – (only appears when Call Terminated event type is selected) defines whether the on demand alert will be a clip alert or will be triggered only when the DTMF digits are entered. Additionally, this field identifies the DTMF digits used to initiate the on demand alert.
- End Clip DTMF Digits – (only appears 1) when Call Terminated event type is selected and 2) when Clip is selected above) identifies the DTMF digits used to end the on demand alert clip.
- DTMF Tolerance - (only appears when Call Terminated event type is selected) identifies the amount of time the user has to complete the entry of the DTMF digits to initiate the on demand alert and, if applicable, end the on demand alert clip.
- Audio Mining Pack - (only appears when Call Terminated event type is selected) allows the user to identify and alert on a specific audio mining pack.
- Minimum Confidence - (only appears when Call Terminated event type is selected) allows the user to identify and alert on the minimum confidence when alerting on audio mining packs.
- Add a Category – allows the user to categorize calls into areas unique to their business (for example: geographic region or customer satisfaction). This category will apply to all calls that fall within the alert criteria and will automatically appear on the Recorded Calls tab when the alert is fired.
- Add a Comment – allows the user to add comments about the call. These comments will apply to all calls that fall within the alert criteria and will automatically appear on the Recorded Calls tab when the alert is fired.
Note:
The From Caller ID, To Caller ID, From Number, To Number, and Location fields must be at least 3 characters long.
- Click in the Email option box to select whether or not you want to be notified by email when an alert occurs by. If you select to be notified by email, then enter the To and From email addresses.
- Click Save to add the alert to the list of Alerts.
The Alerts dialog box displays a list of alerts that have occurred under the Alerts History section. You can clear the Alert History by selecting the alert(s) and clicking the Clear Selected link. You can also view a list of recent alerts by clicking on the Recent Alerts link located at the top of the application page.
