Updating Attix5 Pro SE software
Attix5 Pro SE Backup Clients and their plug-ins are usually set up to be updated automatically, but the process can be carried out manually. This article describes the auto-update process and details the steps required to carry out a manual update.
Auto updates
Attix5 Pro allows you to automate the update process so that the Server Edition Backup Client is updated with the latest software version during the backup process.
Caution:
If a plug-in has been deprecated, the Backup Client will only be updated to the latest version in which the plug-in was still supported.
Attix5 creates update packs that are distributed to the AccountServer. The AccountServer then distributes these packs to the different Backup Clients as they are requested during the backup process.
Note:
Auto Updates must be enabled on the Storage Platform for this feature to work. By default, if there is less than 500 MB free space available, an update pack is not requested. This is logged to the Backup Service log. Backup Clients are always updated to the latest version and service pack available on the Storage Platform.
If a Backup Client update is available, the following will occur. After the backup process has completed, if the Backup Client GUI is open, you will be presented with an update dialog box. You have the option to update now or cancel:
- Clicking Update now closes the Backup Client GUI and installs the update.
- Clicking Cancel closes the dialog box and does not install the update. The dialog box will appear again the next time you back up.
If the Backup Client GUI is closed when an automated backup occurs, the update will be installed automatically. After an Auto Update occurs, the Attix5 Pro system tray icon will display a notification indicating that the update was successfully applied.
Plug-ins can also be updated automatically. During the backup process, the Storage Platform will compare the plug-in versions received from the Backup Client with the latest versions available on the Storage Platform. If newer versions are available, the Backup Client will download the files and automatically update the installed plug-ins.
Manual updates
To manually update Attix5 Pro SE Backup Clients and their plug-ins, proceed as follows.
- Close the Backup Client application interface and the SE system tray icon.
- Run the Attix5 Pro SE Backup Client Installer.
Notes:
A web link to the SE Installer is included as part of your Welcome Information pack from Cloud Direct. Please contact your account manager if you don't have access to the installer.
The SE Installer retrieves the install location from the backup service and cannot be changed as you are upgrading an existing SE Client.
- On the Welcome screen, click Next.
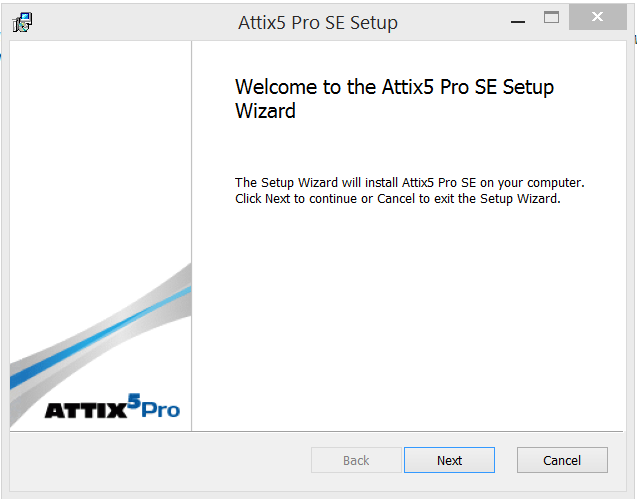
The Ready to install Attix5 Pro SE screen appears.
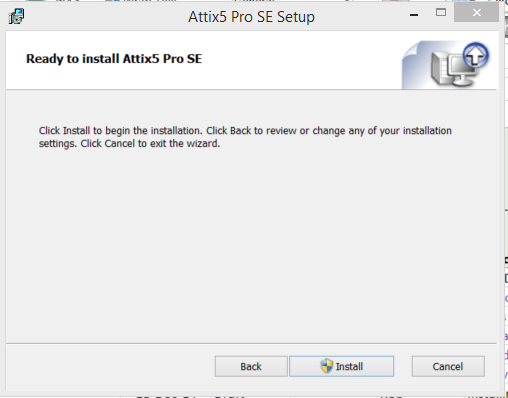
- Click Install.
If the Attix5 Pro SE service is running, a Files in Use wizard screen appears. Click OK to have the installer stop the service, update the software and then restart the service.
If the SE service is not running when the update is being performed, the installer will update the software and start the service thereafter.
When the installation is finished, a Completed screen appears.
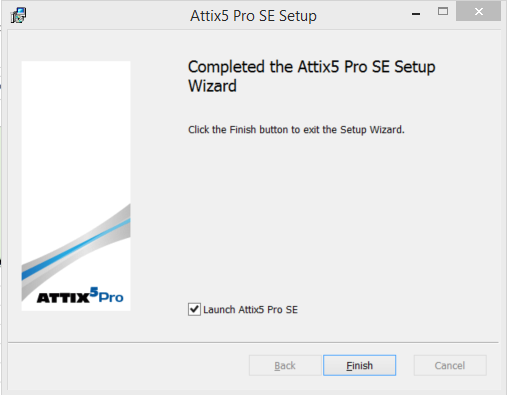
- Launch Backup Client SE is selected by default. Clear the check box if you do not wish to do so.
- If you have the plug-in installer file in the same directory as the new Backup Client installer file, then a Launch Plug-in Installer check box will display above the Launch Backup Client SE check box. If you wish to add or update any plug-ins at this point, ensure that this check box is selected.
Note:
If the plug-in install file is not in the same location as the Backup Client install file. You can manually update installed plug-ins by running the plug-in installer at a later stage. Existing plug-ins are marked with a blue icon and will automatically be updated when you click Next. The plug-ins can also be updated automatically during the next backup process.
- After the Backup Client and, if applicable, Plug-ins are updated, click Finish.
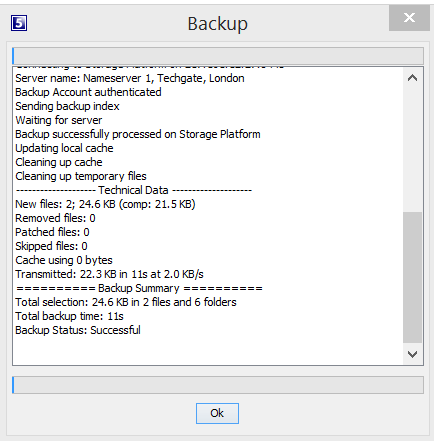
- Confirm that you can open the SE Backup Client and initiate a backup to the Storage Platform. A successful backup is then indicated with a window similar to the one shown below.