
Creating an Attix5 backup account and schedule
An Attix5 Backup Account is required for backing up data. It is created using the Setup Wizard, which also enables configuration of your backup settings. The Setup Wizard consists of the Account Wizard and Backup Wizard combined into one. This article describes how to create an Attix5 backup account, and then schedule data for backup, using the Setup Wizard.
The process comprises the following seven steps:
Account Wizard: Creating the Backup Account
- Step 1 of 7: Specify Storage Platform settings
- Step 2 of 7: Specify Backup Account type
- Step 3 of 7: Enter Backup Account details
- Step 4 of 7: Review Backup Account Summary
Backup Wizard: Scheduling the backup and optimizing the environment
- Step 5 of 7: Schedule the backup process
- Step 6 of 7: Optimise for the backup environment
- Step 7 of 7: Review Backup Schedule Summary
Running the Wizards
The Setup Wizard runs automatically if you ticked the Launch Attix5 Pro SE check box in the last step of the Attix5 Pro SE setup procedure or, if you left this box un-ticked, then the Setup Wizard will run automatically the first time the Backup Client is opened.
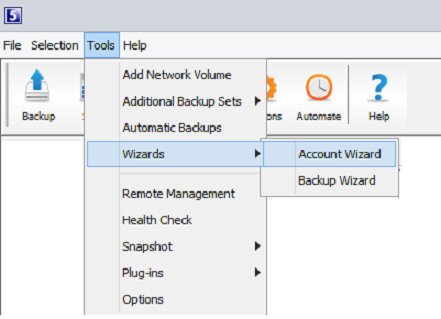
You can run the standalone Account Wizard or Backup Wizard, from within Attix5 Pro, at any other time by clicking:
- Tools > Wizards > Account Wizard
- Tools > Wizards > Backup Wizard
Note:
If you run the Account Wizard, a warning box will appear. Click the Run Account Wizard button and follow the instructions.
Note:
Some of the settings encountered in the Setup Wizard may have been removed when the MSI was created. Furthermore, the wizard may contain additional steps. Please read each window carefully before continuing.
Step 1 of 7: Specify Storage Platform settings
The Setup Wizard opens on the Storage Platform settings page.
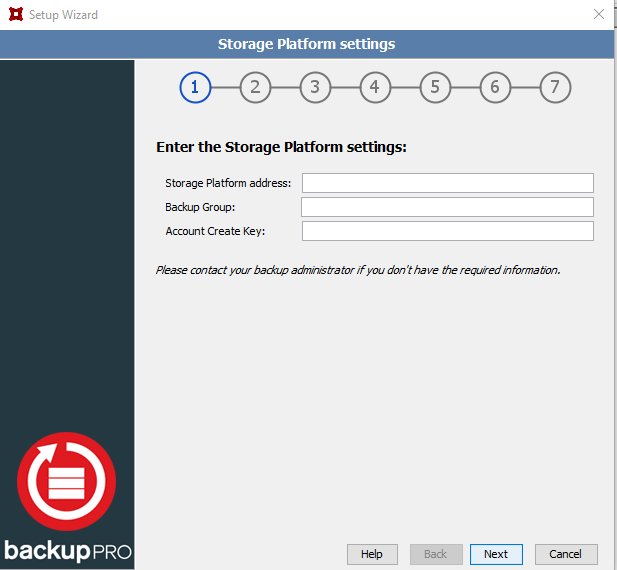
- Complete the following entries on this page. Contact your Backup administrator if you don't have the required information.
- Click Next.
The Specify Backup Account type page appears.
Step 2 of 7: Specify Backup Account type
- Click the required radio button to either create a new Backup Account, or, connect to an existing Backup Account.
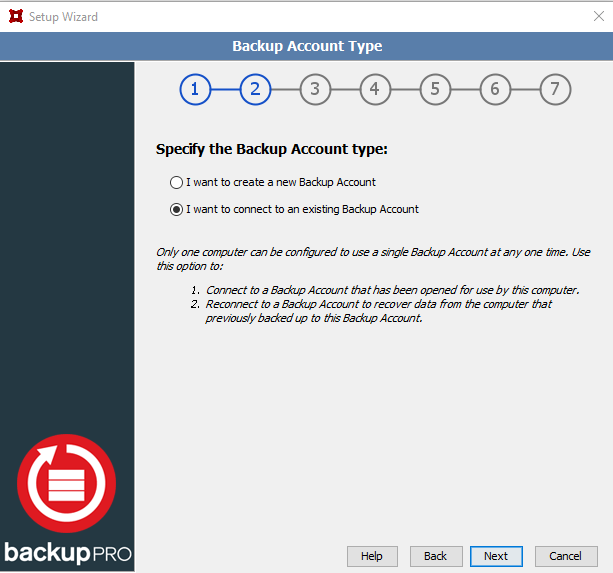
- Click Next.
Your next step depends on what you selected for the Backup Account type.
- If you selected I want to create a new Backup Account, then first go to Specifying new Account details before continuing to Step 3 of 7.
- If you selected I want to connect to an existing Backup Account, then go directly to Step 3 of 7.
Specifying new Account details
To specify new Account details, proceed as follows.
- In the Backup Account name box, type a Backup Account name that consists of a minimum of 4 characters.
- In the Backup Account password box, type a password that consists of a minimum of 4 characters. Confirm it in the Confirm password box.
- In the Encryption key box, type an encryption key that consists of a minimum of 8 characters. Confirm it in the Confirm key box.
Caution:
Please write down your encryption key and store it in a safe place as YOU WILL NOT BE ABLE TO RESTORE YOUR DATA WITHOUT THE ENCRYPTION KEY.
- If you'd like to configure your connection to the Storage Platform, click Set up connection settings…
The Connection Settings page opens.
Caution:
Setting up connection settings should only be carried out by highly experienced, advanced users. Do not attempt to set up connection settings if you are unsure of any aspect of this task.
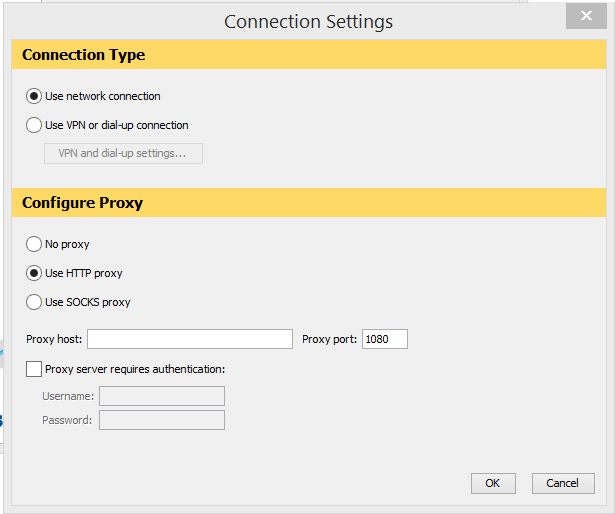
- Specify the Connection Type as either,
- Use network connection, or alternatively,
- Use VPN or dial-up connection. If this option selected, then set the VPN and dial-up settings.
- Configure Proxy settings as either,
- No proxy
- Use HTTP proxy
- Use SOCKS proxy
If choosing Use HTTP proxy or Use SOCKS proxy, then enter a Proxy host address and a Proxy port number. If required, tick the Proxy server requires authentication checkbox and enter the Username and Password for the Proxy server.
- Click OK.
- Click Next.
- Proceed to Step 3 of 7.
Step 3 of 7: Enter Backup Account details
- Enter the following Backup Account Details:
- Backup Account name
- Backup Account password
- Encryption key - The Encryption key was specified when the account was initially provisioned. (Cloud Direct do not store or keep a copy of the Encryption key).
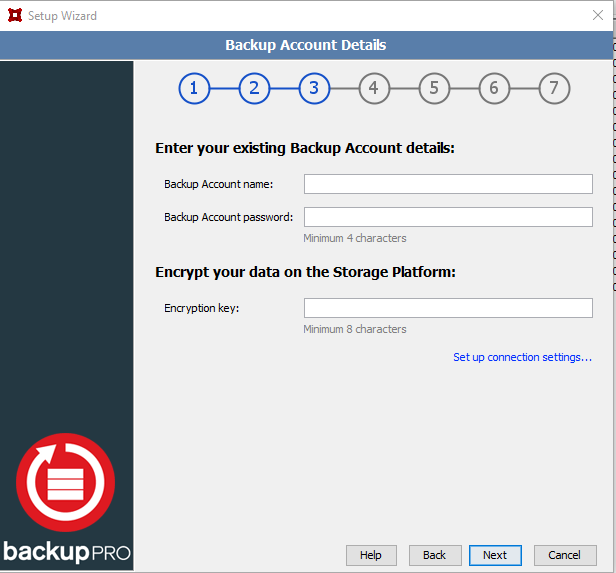
- Click Next.
The Backup Account Summary page opens.
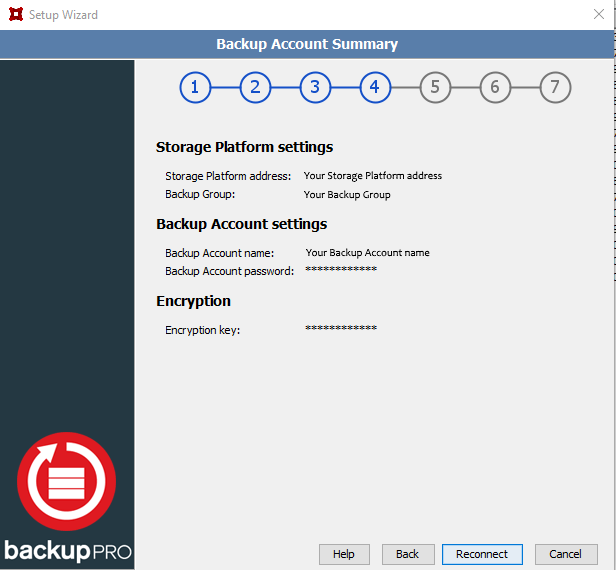
Step 4 of 7: Review Backup Account Summary
The Backup Account Summary page shows the Storage Platform settings and Backup Account settings.
- Review the content then, if happy to proceed, click Reconnect.
The Backup Schedule page opens.
Step 5 of 7: Schedule the backup process
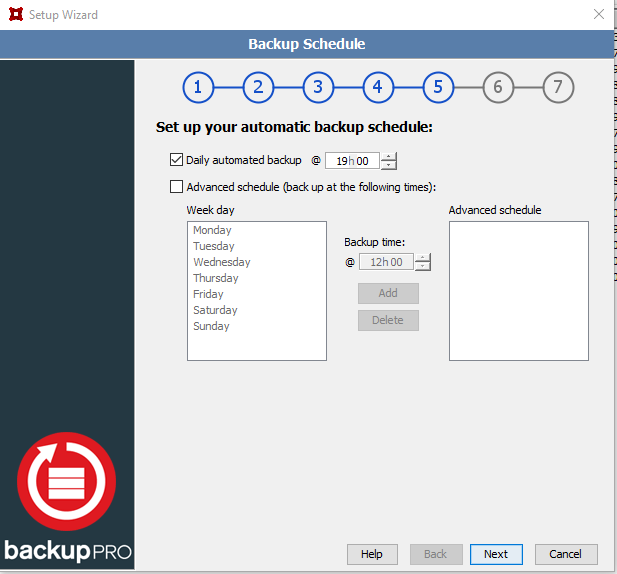
Attix5 Pro can run backups on included files and folders either upon request (manually) or automatically. This step enables you to set up a backup schedule.
Note:
It is advised to back up at night when the server is running, and the Backup Client is not in use. The server must be switched on at the time(s) specified for scheduled backups, but the Windows user does not need to be logged in.
Running manual backups
Caution:
This option is not recommended. If an automated backup schedule is not created, backups will have to be run manually. Enabling automatic backups is strongly advised.
To configure the Backup Client to run only manual backups, proceed as follows.
- Un-tick (clear) the Daily automated backup and Advanced schedule (back up at the following times) check boxes.
- Click Next to move to Step 6 of 7.
Scheduling a daily automated backup
To schedule a daily automated backup, proceed as follows.
- Select the Daily automated backup check box.
- Specify a time in the associated box.
- Click Next to move to Step 6 of 7 or, alternatively, create an advanced backup schedule as described below.
Creating an Advanced schedule
To create an advanced backup schedule, proceed as follows.
- Select the Advanced schedule (back up at the following times) check box.
- In the Week day box, select a day on which a backup should be initiated.
- Specify the time in the Backup time box.
- Click the Add button to add the day and time to the Advanced schedule box.
- Repeat Step 1 to Step 4 above until you have added all desired schedules.
- Click Next to move Step 6 of 7.
The Optimisation page opens.
Step 6 of 7: Optimise for backup environment
The Setup Wizard enables you to quickly optimise your settings for backing up in a specific environment.
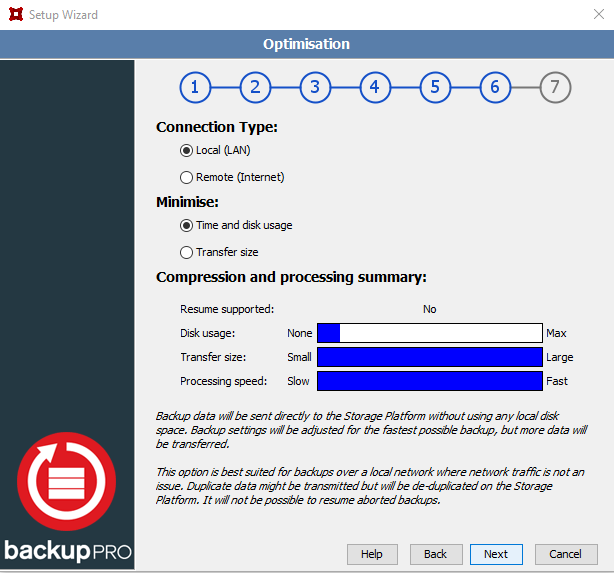
To optimise your settings, proceed as follows.
- Select what type of connection you use to back up; either Local (LAN) or Remote (Internet).
- Select whether you want to Minimise: Time and disk usage or Transfer size.
Using the options you have chosen, the Setup Wizard displays a compression and processing summary that details the effects your choices will have. It also provides a brief summary of these effects.
- Click Next to continue.
The Summary page opens.
Step 7 of 7: Review Backup Schedule Summary
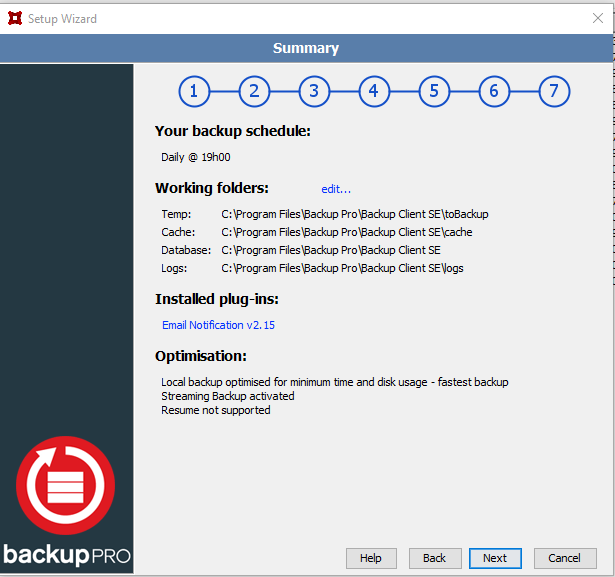
The Summary page shows the choices you have made. It also shows the working folders which you can edit by clicking the edit... link.
Note:
If the drive on which the Backup Client is installed has limited space available, you can move the folders and selection database to another location. The Temp and Cache folders must reside on the same drive/volume.
The wizard also displays a list of installed plug-ins. Certain plug-ins, identified by blue text, can be customised from this step by clicking on the plug-in. Alternatively, you can access and configure the plug-ins later from the Tools menu. Finally, the wizard also displays the optimisation options that you chose, together with the effects of your choices.
- Click Next to complete the wizard.
The Congratulations page opens.
Congratulations
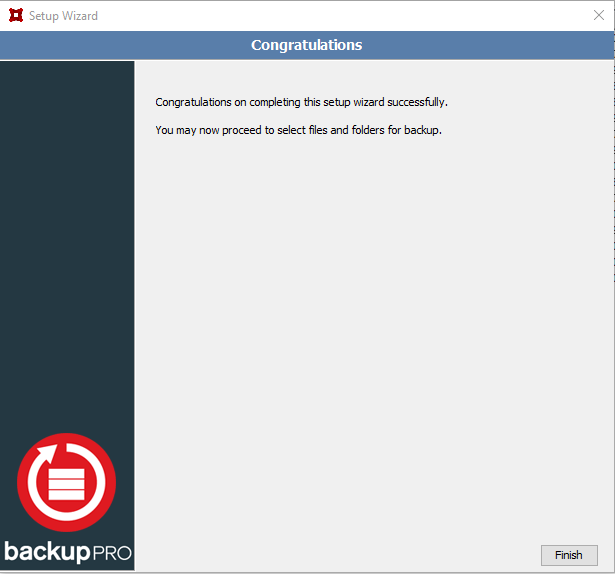
You have now successfully completed the Setup Wizard.
Note:
Backup limits. Following the installation, please check your configured data limit in Tools, Options, Retrieve Settings, and contact the Cloud Direct Service Delivery Team if the configured amount is different from your sales agreement. This check is only possible once the account has been created, installed, and has a working connection to the storage platform.
Caution:
Your Attix5 account has now been correctly installed and, after selecting data to backup, the software will protect your critical data. It is important to liaise with the Cloud Direct Technical Support Team before applying any changes to the environment, to confirm that the Attix5 backup software will continue to function as intended.
- Click Finish, and select data to back up.
