
Setting up and using the Toolbar
The Cloud Direct Telephony Toolbar, more commonly known simply as the Toolbar, is a desktop communications management product for everyday users of Microsoft Outlook, Microsoft Internet Explorer, or Mozilla Firefox. With the Cloud Direct Toolbar you can manage your incoming and outgoing messages, maintain up-to date connection information, and configure controls on your calls and voice mail.
This article describes how to set up and use the Toolbar once it has been installed on your computer. If you do not have the Toolbar installed, then please refer to knowledge article, KB0010785 Installing the Toolbar, before proceeding.
Getting started
First time login
Logging in to the Toolbar identifies you to the servers that manage your phone services. This enables you to receive, initiate, and control calls directly from your computer. When you log in for the first time, you need to configure your Account Settings and General Settings as described below. Once these settings are configured, you do not need to provide them again.
Logging in
To log in to the Toolbar,
- Click the Login button.

Note:
The Login button is used to log in and log out of the Toolbar. It displays the following states:
A grey button indicates that you are logged out.
A green button shows that you are logged in.
A disabled button shows that the Cloud Direct Toolbar is attempting to log you in.
A red button indicates that your last login attempt failed.
- Click the Options button.

The Cloud Direct Toolbar Options window opens.
Configuring Account settings
- In the left hand navigation pane, select Account to open the Account page.
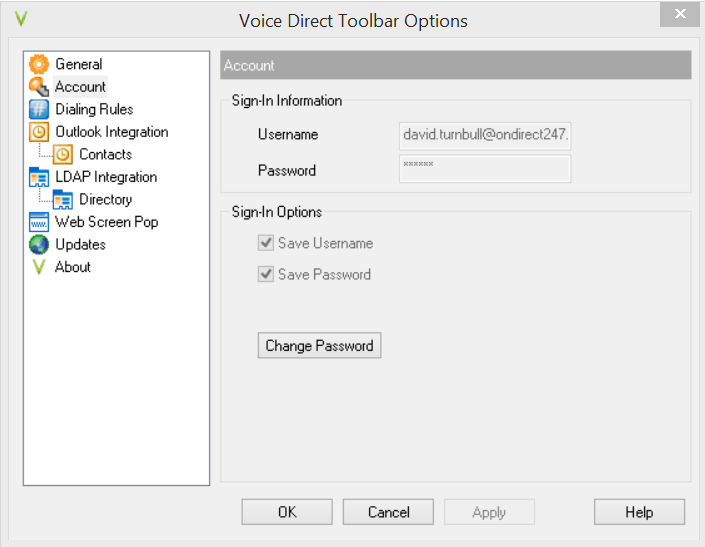
- Under Sign-In Information, enter the Username and Password provided by your Administrator for your Toolbar account.
- Under Sign-In Options tick the Save Username and Save Password checkboxes to have the system remember your username and password for when you next log in.
- Click Apply.
Configuring General settings
To configure your general settings,
- Click General in in the left hand navigation pane.
The General Options page opens.
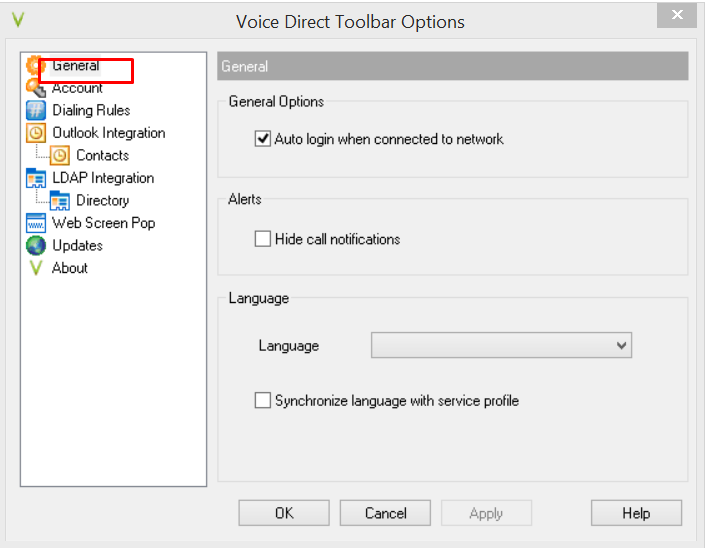
- Tick the Auto login when connected to network checkbox to have the Toolbar connect automatically to the Cloud Direct server when a network connection is available.
- Leave the Alerts checkbox un-ticked unless you wish to hide call notifications.
- From the Language drop down menu, select required language. The default is English (US).
Note:
Synchronize language with service profile, when checked, enables the Toolbar to automatically match the application language to the language set within the Cloud Direct subscriber's profile after signing in. If no profile match is found, the language remains set to the current language.
- Click OK, and restart the Toolbar for the changes to take place.
When you next log in you will be prompted to change your password. Then, if your configuration and credentials are correct, you are connected to the Cloud Direct server and the buttons on your toolbar are enabled.
Subsequent login
Once you have configured Cloud Direct Toolbar with the settings it needs to connect to your service provider, you can log in without having to provide that information again.
Using the Toolbar
Once you have logged in, and configured your Account settings and General settings, you are ready to use the Toolbar. The following sections describe how to use the Toolbar to:
- Set your CommPilot Express profile
- Use directories
- Configure your services, and turn services on and off
- Make outgoing calls
- Handle incoming calls
Setting your CommPilot Express profile
CommPilot Express allows you to manage your personal inbound calls based on your schedule, using four configurable profiles: In Office, Out of Office, Busy, and Unavailable.
Set your CommPilot Express profile by selecting an option from the CommPilot drop-down list.
To disable all profiles, select the option CommPilot - None.
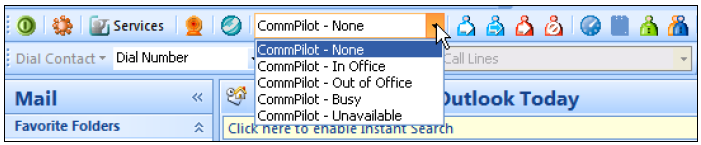
To configure CommPilot profiles, see Configuring your services.
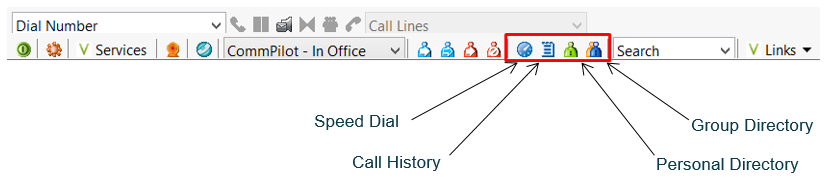
Using directories
The following directories are available to you from the Cloud Direct Toolbar:
- Speed Dial – Contains your speed dial entries
- Call History - Allows you to view your missed calls, received calls, and dialed calls.
- Personal Directory – A directory of personal contacts.
- Group Directory - Integrates the group contacts, provided by your service provider.
Configuring your services
Telephony features or services to manage incoming and outgoing calls, call control and Voicemail messaging can be easily configured using the Toolbar.
Note:
Only services assigned to you will be accessible and configurable.
The following features may be configured using the Toolbar.
- Incoming Calls
- Anonymous Call Rejection
- Call Forwarding Always
- Call Forwarding No Answer
- Call Forwarding Busy
- Do Not Disturb
- CommPilot Express
- Available-In Office
- Available-Out of Office
- Busy
- Unavailable
- External Calling Line ID Delivery
- Internal Calling Line ID Delivery
- Simultaneous Ringing
- Outgoing Calls
- Automatic Callback
- Calling Line ID Delivery Blocking
- Call Control
- Call Waiting
- Remote Office
- Messaging
To configure your telephony features proceed as follows:
- On the Toolbar, click the Services button.

The Cloud Direct Toolbar Services window opens.
- From the list in the left-hand side of the window, select the service you want to configure.
- On the right-hand side, select or enter required information. When a feature is selected, an explanatory description is also included in the right-hand side of the window to assist the User.
For example, selecting Call Forwarding Always from the list in the left-hand side of the window reveals the following description in the right-hand side of the window, "Call Forwarding Always: Automatically forward all your incoming calls to a different phone number", together with required radio buttons and fields to complete.

- When finished, click OK.
Turning services on and off
Features can be configured and turned on or off from the Services window. However, some of the more commonly used features have been allocated individual buttons on the Toolbar so that they can be turned on or off quickly. These features are:
- Remote Office
- Simultaneous Ring
- Call Forwarding Always
- Call Forwarding No Answer
- Call Forwarding Busy
- Do Not Disturb

Making outgoing calls
The Cloud Direct Toolbar offers a number of different ways to initiate an outgoing call.
Dialling a number
- In the Dial Number box, type the number you want to call.

- Press Enter on your keyboard.
The entered number will now be called.
Redialling a number
You can redial up to ten previously dialed numbers.
- Click the arrow at the right-hand side of the Dial Number box
- On the Dial Number list, click the number you want to redial.
- Press Enter on your keyboard.
The entered number will now be called.
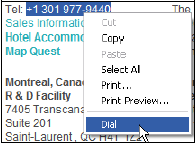
Dialling from a webpage (Internet edition)
- On a web page, select a phone number.
- Highlight and right-click the number.
- On the shortcut menu, click Dial.
Dialling from the Group, or Personal, directory
- On the Cloud Direct Toolbar, click the Group Directory button, or the Personal Directory button.

- On the list that appears, click the desired phone number.
The selected number will now be called.
Dialling from the Speed Dial directory
- On the Cloud Direct Toolbar, click the Speed Dial button.

- On the list that appears, click the desired phone number.
The selected number will now be called.
Dialling from the Call History directory
- On the Cloud Direct Toolbar, click the Call History button.

- On the list that appears, click the desired phone number.
The selected number will now be called.
Dialling from the Search box
- In the Search box, type your search criteria, for example a surname. Alternatively click the arrow at the right-hand side of the Search box and select a previous search from the list.

- Press Enter.
The Cloud Direct Toolbar displays the results of your search.
- Click the phone number you want to dial.
The selected number will now be called.
Handling incoming calls
The Cloud Direct Toolbar offers a number of features for holding and transferring incoming calls. These are described below.
Call Lines Selector
The Call Lines Selector is a drop-down list that shows current calls and lets you pick the call you want to perform an action on. It is used with features such as Hold Call and Un-Hold Call, described later in this article.

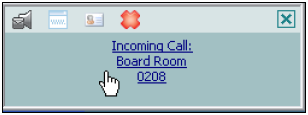
Call Notification window
When you initiate or receive a call, the Cloud Direct Toolbar displays a small Call Notification window in the bottom corner of the screen. This includes the other party's identification, taken from BroadWorks or Outlook directories.
Answer a call
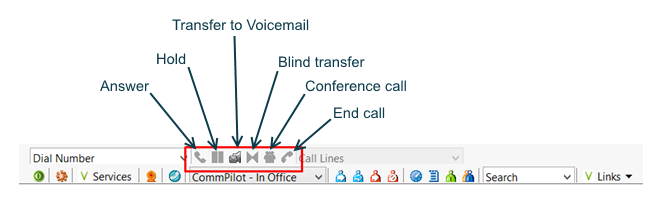
To answer an incoming call from the Toolbar, simply click the Answer button. Alternatively click the Call Notification window.
Blind Transfer
Incoming calls can be blind transferred while active, held, or ringing in on your phone. The call is transferred directly to a third party, without a prior conversation with the destination party. This is useful when you are certain the destination party is present.
Note:
If the third party destination is unavailable then the call may ring out or go to voicemail. To avoid this, if you aren't certain that the third party destination is available then a Consultative Transfer may be more suitable. See Consultative Transfer below.
To initiate the Blind Transfer of an incoming call to a third party:
- Call the third party destination number (See Making outgoing calls).
This automatically puts the first party on hold, if the first party is not already on hold.
- On the Toolbar, click the Transfer button .
The incoming call is now transferred to the third party destination.
Consultative Transfer
Calls can be transferred to a third party with consultation while active, held or ringing in on your phone. This means the incoming caller is placed on hold until the destination party answers and a conversation can take place. This is useful for checking whether the destination party is present and available before transferring the incoming call.
- Call the destination party number.
This puts the first party on hold.
- Wait until the destination party accepts your call, and then click the Transfer button to connect the parties.
End a call
You can end incoming and outgoing calls from the Toolbar and from the Call Notification window.
Click the End button on the Toolbar or click the End Call button in the Call Notifcation window .
Hold a call
- On the Call Lines Selector list, select the call to hold from the drop down menu.

- Click the Hold button.
The incoming caller is now placed on hold.
Unhold a call
- On the Call Lines Selector list, select the held call from the drop down menu.

- Click the Answer button.
The incoming caller is now removed from hold.
Transfer a call to Voicemail
You can transfer calls directly to your Voicemail from the Toolbar, or from the Call Notification window.
To transfer to Voicemail:
- Click the Transfer to Voice Mail button on the Toolbar.

Alternatively, click the same button in the Call Notification window.
The call is transferred to your Voicemail.
Retrieve Voicemail
Before retrieving Voicemail messages, make sure that you are not currently engaged in a call. Check that there are no entries present on the Call Line Selector list.
To listen to your Voicemail:
- Click the Transfer to Voice Mail button on the Toolbar.

Follow the voice prompts to listen to your messages.
