
Blocking unwanted emails by using the Junk Email Filter (for Outlook users)
The Outlook Junk Email Filter checks the sender of every incoming message against lists of email addresses and Internet domains (the part of the email address after the @ symbol) designated either as safe, or to be blocked. You can customise the filter to block or allow senders or message types.
This article describes how Outlook users can block unwanted emails by using the Junk Email Filter.
The article contains the following sections:
- Preventing trusted senders from being blocked
- Blocking messages from someone
- Blocking messages from particular country/region codes
- Blocking messages that contain unfamiliar alphabets
- Changing the level of protection in the Junk Email Filter
Preventing trusted senders from being blocked
By adding email addresses and domain names that you trust to the Safe Senders List, you instruct Outlook that messages from those sources are never to be considered as junk. If you belong to mailing lists or distribution lists, you can also add these names to your Safe Recipients List.
To add a person to the Safe Senders List, proceed as follows.
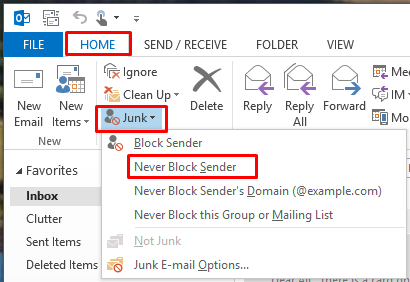
- From within Outlook, click a message from the sender.
- Click the Home tab.
- In the Delete group, click Junk, and then click Never Block Sender.
To add an email address or domain to the Safe Recipients List, proceed as follows.
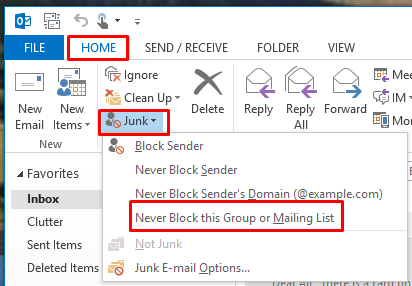
- From within Outlook, click a message from the group or mailing list.
- Click the Home tab.
- In the Delete group, click Junk, and then click Never Block this Group or Mailing List.
Adding safe senders and safe recipients if you don't have a message
If you don't have a message from the person or group, you can still manually add email addresses or domains to these lists by doing the following:
- From within Outlook, click the Home tab.
- In the Delete group, click Junk, and then click Junk Email Options.
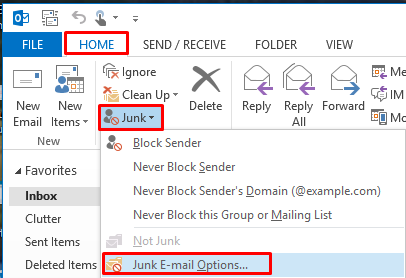
The Junk E-mail Options page opens.

Adding safe senders
- To add safe senders, proceed as follows.
- Click the Safe Senders tab.
The Safe Senders page opens.
- Click Add.
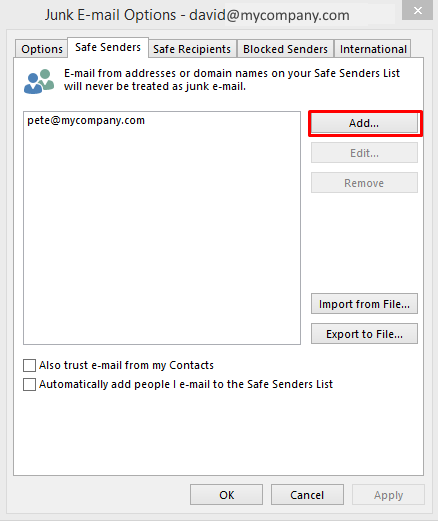
The Add address or domain window appears.
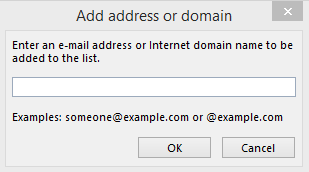
- Enter the name or address that you want to add. For example, you can add a specific email address, such as someone@example.com, or an Internet domain, such as @example.com, or example.com.
- Click OK.
The address appears in your Safe Senders list.
- Repeat Step 3b to Step 3d for each entry that you want to add.
- If you want all Contacts to be considered safe senders, tick the Also trust email from my Contacts check box.
- Some people who you correspond to might not be listed in your Contacts. If you want all such people to be considered as safe senders, tick the, Automatically add people I email to the Safe Senders List check box.
- If you have existing lists of safe names and addresses, you can move that information into Outlook. To do this, click Import from File, and browse for the list file that you want. To create a file that uses your current list, click Export to File and then specify where you want the new file saved.
Note:
To change a name on the Safe Senders list, click the name that you want to change and then click Edit. To remove a name, click the name that you want and then click Remove.
Adding safe recipients
- To add safe recipients, proceed as follows.
- Click the Safe Recipients tab.
The Safe Recipients page opens.
- Click Add.
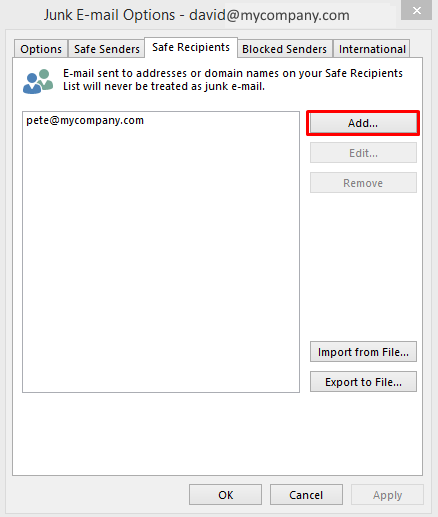
The Add address or domain window appears.
- Enter the name or address that you want to add. For example, you can add a specific email address, such as someone@example.com, or an Internet domain, such as @example.com, or example.com.
- Click OK.
The address appears in your Safe Recipients list.
- Repeat Step 3b to Step 3d for each entry that you want to add.
- If you have existing lists of safe names and addresses, you can move that information into Outlook. Click Import from File and browse for the list file that you want. To create a file that uses your current list, click Export to File and then specify where you want the new file saved.
Note:
To change a name on your Safe Recipients list, click the name that you want to change and then click Edit. To remove a name, click the name that you want and then click Remove.
Note:
If you are using a Microsoft Exchange Server account, all of the names and email addresses that are in your organisation's address book, also known as the Global Address List, are automatically considered safe.
Blocking messages from someone
Messages from email addresses or domain names in the Blocked Senders List are always treated as junk. Outlook moves any detected incoming message from senders in the Blocked Senders List to the Junk Email folder, regardless of the content of the message.
Note:
The Outlook Junk Email Filter doesn't stop junk email from being delivered, but instead diverts suspected spam to the Junk Email folder. You can change the sensitivity of the Junk Email Filter by changing its level of protection, or by using third-party solutions, which can be more aggressive.
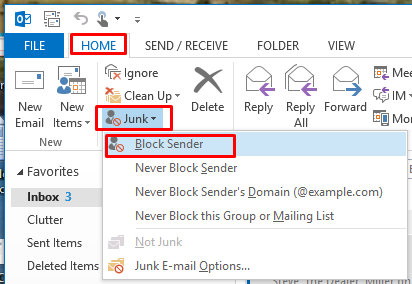
To add someone to the Blocked Senders List, proceed as follows.
- From within Outlook, click a message from the sender.
- Click the Home tab.
- In the Delete group, click Junk, and then click Block Sender.
Adding addresses to the Blocked Senders List if you don't have a message
If you don't have a message from the person, you can still manually add email addresses to the Blocked Senders List. To do this, proceed as follows.
- From within Outlook, click the Home tab.
- In the Delete group, click Junk, and then click Junk Email Options.
The Junk E-mail Options page opens.
- Click the Blocked Senders tab.
The Blocked Senders page opens.
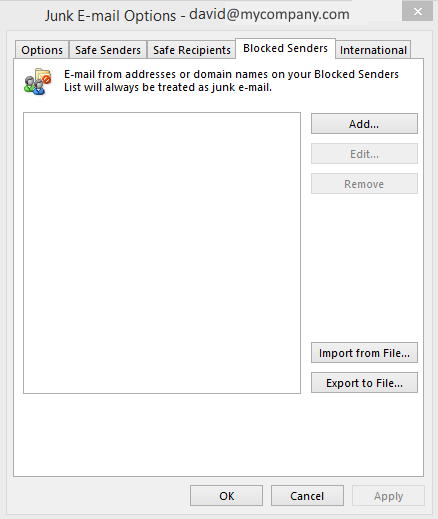
- On the Blocked Senders page, click Add.
The Add address or domain window appears.
- Enter the name or address that you want to add. For example, you can add a specific email address, such as someone@example.com, or an Internet domain, such as @example.com, or example.com.
- Click OK and repeat Step 4 to Step 5 for each entry that you want to add.
Each address entered now appears on your Blocked Senders list.
Notes:
If you have existing lists of safe names and addresses, you can move that information into Outlook. To do this, click Import from File and browse for the list file that you want. To create a file that uses your current list, click Export to File and then specify where you want the new file saved.
To change a name on the list, click the name that you want to change and then click Edit. To remove a name, click the name that you want and then click Remove.
If you are using a Microsoft Exchange account, all of the names and email addresses that are in your organisation's address book, also known as the Global Address List, are automatically considered safe and can't be added to the blocked list.
Blocking messages from particular country/region codes
You might find that unwanted email messages come from particular countries/regions. By using the Blocked Top-Level Domain List, you can block messages from those areas. This list blocks messages from email addresses that end in a particular top-level domain or country/region code. For example, selecting the CA (Canada), US (United States), and MX (Mexico) check boxes in the list blocks messages where the sender's email addresses ends in ca, us, or mx. Additional country/region codes appear in the list.
To block messages from particular country/region codes, proceed as follows.
- From within Outlook, click the Home tab.
- In the Delete group, click Junk, and then click Junk Email Options.
The Junk E-mail Options page opens.
- In the Junk E-mail Options page, click the International tab.
The International page opens.
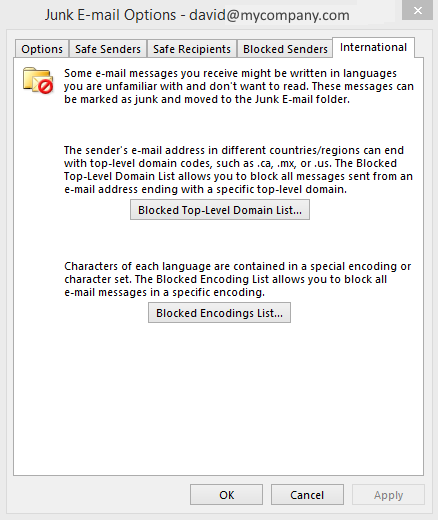
- On the International page, click Blocked Top-Level Domain List.
The Blocked Top-Level Domain List opens.
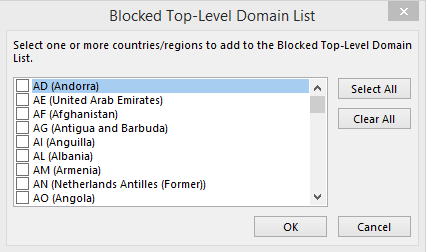
- In the list, tick the check box for the country/region code that you want to block, or click Select All.
- Click OK in both open dialog boxes.
Email messages from selected countries/regions will now be blocked.
Blocking messages that contain unfamiliar alphabets
You can block all email message by language encodings, also known as character sets or alphabets. Today, most junk email is sent in the U.S.-ASCII encoding. By using the Blocked Encodings List, you can filter out unwanted email messages that are displayed in languages that you don't understand.
To block messages that contain unfamiliar alphabets, proceed as follows.
- From within Outlook, click the Home tab.
- In the Delete group, click Junk, and then click Junk Email Options.
The Junk E-mail Options page opens.
- In the Junk E-mail Options page, click the International tab.
The International page opens.
- On the International page, click Blocked Encodings List.
The Blocked Encodings List opens.
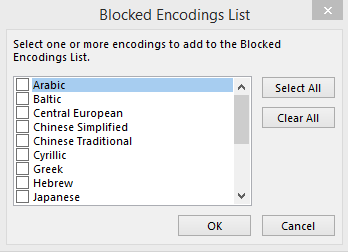
- In the list, click the language encoding that you want to block, or click Select All.
- Click OK in both open dialog boxes.
Email messages containing selected unfamiliar alphabets will now be blocked.
Note:
Unicode encodings aren't included in the Blocked Encodings List.
Messages that have unknown or unspecified encodings are subject to filtering by the regular Junk Email Filter.
Changing the level of protection in the Junk Email Filter
The Junk Email Filter is designed to keep junk email messages, also known as spam, from cluttering your Inbox. By default, the Junk Email Filter is turned on, and the protection level is set to Low, the setting designed to catch the most obvious spam. You can adjust the sensitivity of the Junk Email Filter. Messages detected by the Junk Email Filter are moved to the Junk E-mail folder.
Note:
While the Outlook Junk Email Filter protects against much of the spam sent to you, no filter can catch every junk message.
Changing the level of junk email protection
To change the level of junk email protection, proceed as follows.
- From within Outlook, click the Home tab.
- In the Delete group, click Junk, and then click Junk Email Options.
The Junk E-mail Options page opens.
- In the Junk E-mail Options page, select the level of protection that you want:
- No Automatic Filtering - Although this turns off the automatic Junk Email Filter, messages are still evaluated by using the domain names and email addresses in your Blocked Senders List.
Note:
If you want to turn off the Junk Email Filter, you must also remove names from the Junk Email Filter lists.
- Low - If you don't receive many junk messages, or want to filter only the messages that are the most obvious junk, select this option.
- High - If you receive lots of junk messages, but don't want to restrict messages from senders on your safe lists, select this option. You should periodically review messages moved to the Junk Email folder, because some legitimate messages might also be moved.
- Safe Lists Only - This is the most restrictive option. Any message that is sent neither from someone on your Safe Senders List nor to a mailing list on your Safe Recipients List, is classified as junk.
Note:
Changing the level of protection affects only those mail accounts that deliver and save messages to your computer. This includes all email accounts that use an Outlook Data File (.pst), including POP3 and IMAP accounts. Also, protected are Microsoft Exchange Server accounts that are configured to use Cached Exchange Mode, which use an offline Outlook Data File (.ost).
Deleting messages instead of moving them to the junk email folder
To delete unwanted messages instead of moving them to the junk email folder, proceed as follows.
- From within Outlook, click the Home tab.
- In the Delete group, click Junk, and then click Junk Email Options.
The Junk E-mail Options page opens on the Options tab.
- Tick the Permanently delete suspected junk e-mail instead of moving it to the Junk E-mail folder check box.
Note:
When suspected junk messages are deleted, unlike other messages, they are not moved into the Deleted Items folder.
Any suspected junk email will now be permanently deleted.
