
Setting up a Snapshot and Reverse Snapshot
The Attix5 Backup Snapshot feature enables you to create a backup of all items included in your backup selection, and send it to a disk drive. The Snapshot data can then be moved, via the disk drive, to the Storage Platform. This feature is often used to reduce the initial backup window if there is a large amount of data to be transferred, typically over a slow network connection.
A similar procedure, sometimes called Reverse Snapshot, enables you to quickly restore a large amount of data (For example, during a disaster recovery).
This article contains two parts:
These are described in the following paragraphs.
Prerequisites
Before beginning this procedure, please consider the following:
- Only the Attix5 backup administrator should modify the backup settings described in this article.
- Ensure that you have an active Attix5 backup account.
- Before beginning the Backup Snapshot process, it is advisable to perform a test backup, transferring only a small amount of data, to ensure that the StorageServer connection is successful.
Exporting a Backup Snapshot
To export a Backup Snapshot, proceed as follows, from the Attix5 Pro SE Client.
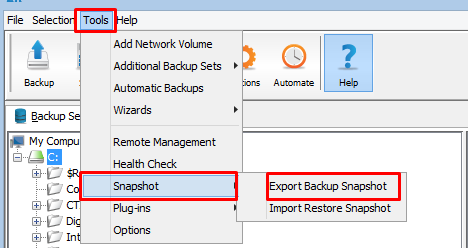
- Open your Attix5 Pro SE client.
- On the Tools menu, point to Snapshot, then click Export Backup Snapshot.
The Export Backup Snapshot dialogue box opens.
- Select The next backup must be a Snapshot backup.
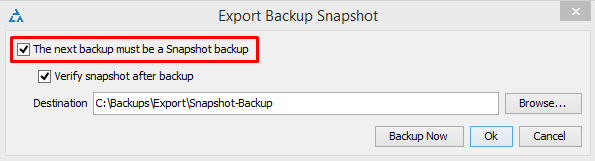
- In the Destination box, specify a destination folder for the Snapshot backup. This is generally a removable disk drive that may be transported to the Storage Plaform.
- Click OK.
- Initiate a backup. (If required, refer to knowledge article, KB0010749, Starting an Attix5 backup, for further details).
The Snapshot data is now stored in the location specified in Step 3 above, and may now be physically moved to the Storage Platform.
Note:
Your Attix5 Backup Account will be disabled at this point to ensure that the Snapshot data is the most recent. Once the data has been successfully imported to the Storage Platform, your Account will be enabled automatically, and backups can proceed as usual.
Restoring a Backup Snapshot (Reverse Snapshot)
The Restore Snapshot feature enables you to restore large amounts of data from a locally connected device, to a machine, via the Attix5 Backup Client.
Note:
Before you can perform the steps outlined below, the snapshot data needs to be exported from the StorageServer to an external mobile storage device, or Recovery Server, by a backup administrator.
To restore data from a Snapshot, proceed as follows.
- Connect the mobile storage device (or server), containing the snapshot data, to the machine (or to a Local Area Network so that it has access to the machine).
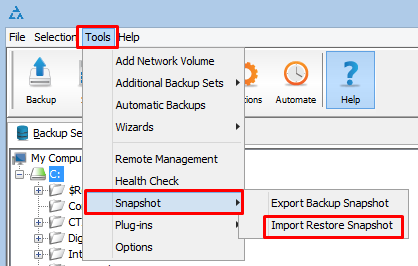
- Open your Attix5 client.
- On the Tools menu, point to Snapshot, and then click Import Restore Snapshot.
The Import Restore Snapshot dialogue box opens.
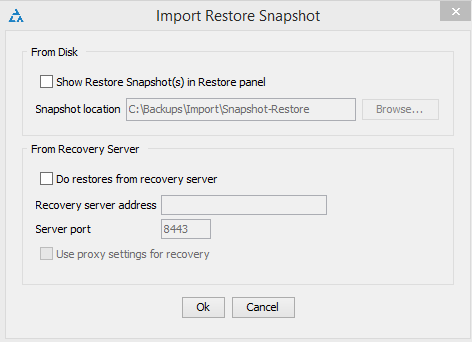
- Decide whether you wish to restore the data From Disk, or From Recovery Server, then proceed to Step 5 or Step 6 below, as applicable.
- If restoring from disk, tick the Show Restore Snapshot(s) in Restore panel check box, and then, in the Snapshot location box, specify the path to the data.
Caution:
The Snapshot location default is, C:\Backups\Import\Snapshot-Restore.
If you wish to use this location, you need to create the folder structure on the machine and then paste the snapshot data onto the Snapshot-Restore folder. The Snapshot-Restore folder is not created automatically.
Alternatively, you can use the Browse button to browse to a different location to save the restored snapshot data.
Note:
You need to specify the snapshot data's parent folder, and NOT the snapshot folder itself.
For example, if your snapshot data folder is called 20100506124347 and you've pasted it to your desktop, then you need to specify, C:\Users\Administrator\Desktop, in the Snapshot location box, and NOT, C:\Users\Administrator\Desktop\20100506124347.
- If restoring from a recovery server, tick the Do restores from recovery server check box, and then specify the server address and port number in the boxes provided. If using a proxy server, tick the Use proxy settings for recovery check box.
- Click OK.
The Snapshot data is displayed as an entry in the Restore tree, enabling you to browse its contents and restore files and folders from the Restore tab. (If required, refer to knowledge article, KB0010732, Restoring an Attix5 backup, for details of how to restore data).
