


Starting an Attix5 backup
After creating an Attix5 Backup Account and selecting data to backup, you can then start to backup your valuable data. If you have not already selected data for backup then please refer to knowledge article, "Creating or modifying an Attix5 backup selection".
This article describes how to:
Start a backup manually
Schedule an automatic backup
Cancel a backup
Resume a failed or cancelled backup
Note:
Any changes, additions or deletions to included files and folders will be backed up intelligently with every manual or scheduled backup.
Starting a backup manually
Note:
It is recommended that you run a backup manually after creating your backup selection to ensure immediate data transmission to the Storage Platform. Thereafter, automatic backups will ensure hassle-free continuous backups.
To start a backup manually, proceed as follows.
- On the File menu, click Backup Now.

Alternatively, click the Backup button on the toolbar  .
.
The Backup dialog box appears and displays the progress of the backup.
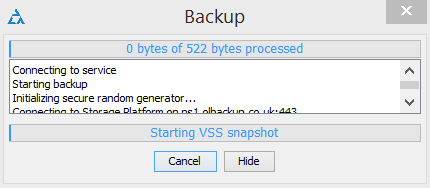
If multiple backup sets are enabled and their backup windows overlap, a backup queue will display in the Backup dialog box, enabling you to cancel the current backup in favour of the next, should you wish to do so.
To close the Backup Client after the backup process has started,
- Click the Hide button. This will not cancel the backup process and the Backup Client can be re-opened at any time to view the progress of the backup.
Note:
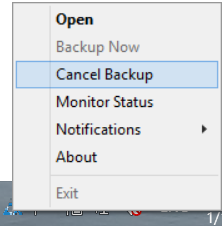
You can monitor the backup progress at any time by right-clicking the Attix5 icon in the system tray and then clicking Monitor Status.
To view backup logs, click the Logs tab. Backup log dates are displayed in blue.

Scheduling automatic backups
Automatic backups are usually enabled and configured at initial set up using the Setup Wizard or the Backup Wizard. However, you can enable and schedule automatic backups at any point in time using the Options and Settings dialog box.
Scheduling a daily automated backup
- On the Tools menu, click Options. Alternatively, click the Options button
 on the toolbar.
The Options and Settings window appears.
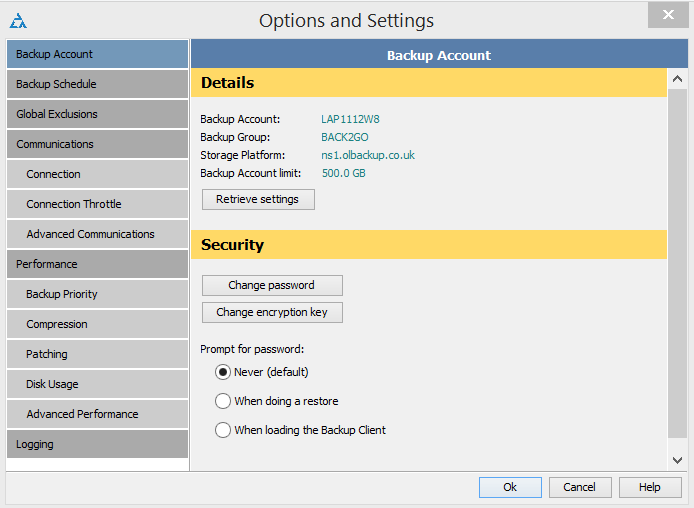
- In the left hand pane, click Backup Schedule.
The Backup Schedule: Automatic Backups page opens.
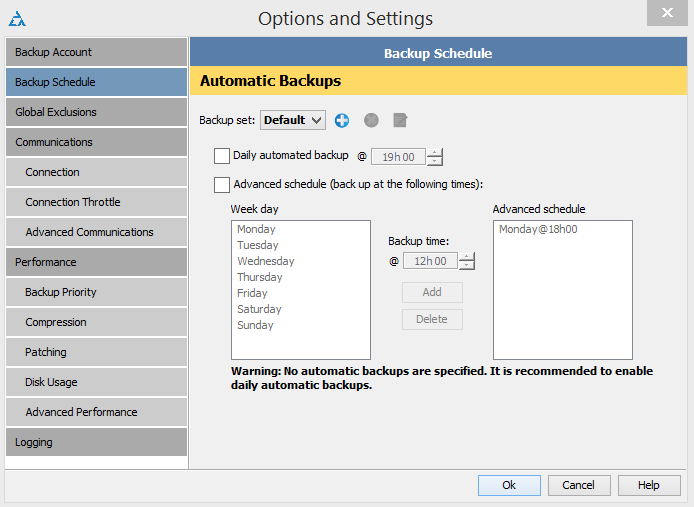
- If multiple backup sets are enabled, ensure that the correct set is selected in the Backup set drop-down box.
- Tick the Daily automated backup check box, and then specify a backup time in the associated box.
- Click OK.
Creating an advanced backup schedule
- Tick the Advanced schedule (back up at the following times) check box.
- In the Week day box, select the day on which a backup should be initiated.
- Specify the time in the Backup time box.
- Click the Add button to add the day and time to the Advanced schedule box.
- Repeat steps 2 to 4 above until you have added all desired schedules to the Advanced schedule box.
Note:
You are advised to back up at night when the server running the Backup Client is not in use. It must be switched on at the scheduled backup time(s), but the Windows user does not need to be logged in.
Configuring automatic backups ensures that all selected data is backed up automatically, without the need for any user interaction. This is a safer alternative to relying on manual backups.
Backups will initiate at the scheduled times, and the Backup dialog box will appear displaying the progress of the backup.
If multiple backup sets are enabled and their backup windows overlap, a backup queue will display in the Backup dialog box, enabling you to cancel the current backup in favour of the next, should you wish to do so.
Notes:
To close the Backup Client after the backup process has started, click the Hide button. This will not cancel the backup process and you can re-open the Backup Client at any time to view the progress of the backup.
You can monitor the backup progress at any time by right-clicking the Attix5 icon in the system tray and then clicking Monitor Status.
To view backup logs, click the Logs tab. Backup log dates are displayed in blue.
Backups will be stored on the Storage Platform and will be accessible via the Restore tab.
Cancelling a backup
Once a backup is in progress, you can cancel the process using the Backup dialog box or via the Attix5 icon in the system tray.
To cancel a backup, proceed as follows.
- Perform one of the following actions.
- In the Backup dialog box, click the Cancel button.
- Alternatively, you can right-click the Attix5 icon in your system tray, and then click Cancel Backup.
- In the confirmation dialog box that appears, click Yes.
Resuming a backup
By default, the Backup Client tries to connect to the Storage Platform four times before cancelling the backup process. If, however, the previous backup was not successful and a manual backup is initiated, the Backup Client will display the prompt, "Do you want to resume the failed backup...?" with a 30 second countdown.
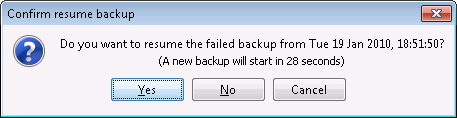
Click Yes to instruct the Backup Client to try to continue from where the process failed during the previous backup. Alternatively, click No to initiate a new backup, or Cancel to return to the Backup Client application window.
Note:
You can only resume a backup if the backup completed the Processing stage.