
Attaching a TRA
A TurboRestore® Appliance is a data storage vault on your premises, enabling local network speed backups and restores of data to your protected computers (servers). Using a TurboRestore Appliance can dramatically reduce the data recovery times, by having onsite as well as offsite backups available. You can set up your computers to back up data only to the appliance, or to the appliance and the offsite data centre.
You can order an appliance from Cloud Direct, or build a custom appliance according to your own specifications.
This article explains how to attach a TRA to your LiveVault agent computer and establish a connection to an offsite data protection vault. The article also contains instructions for running an initial backup, and recovering your TRA if it fails.
Note: TRA or MRS?
The term TRA is often used to refer to an MRS (Media Restore Server). They are both on-site data storage devices used by LiveVault but, strictly speaking, the MRS is a short term temporary device used for restores only, while the TRA may be short or long term, and is used for both backup and restore. If you have requested a temporary restore device containing your backed up data be sent from LiveVault then it is likely to be an MRS. If this is the case, please refer to knowledge article, KB0010685, Restoring a LiveVault backup using a Media Restore Server.
Adding a TurboRestore Appliance
When you receive your TRA, you connect it into your network environment and configure it to connect to the LiveVault service. Before connecting your TRA, record the appliance service tag and Windows product key available on the top of the TRA unit, for future reference if you need to contact Cloud Direct.
Connection and configuration of your TRA requires the following steps,
- Connecting the TRA
- Determining the TRA network address.
- Provisioning the TRA to the LiveVault service.
- Configuring your computer(s) to back up to the TRA.
These steps are detailed below.
Connecting the TRA
Connecting your TRA may simply be a matter of plugging in the appliance, but you may have to configure your site firewall to open ports for outbound TCP connections to the LiveVault service first.
Configure firewall access
To configure your firewall for an appliance,
- If necessary, open ports 2144 and 2145 for outbound TCP access.
- Ports 80 and 443 will also need to be open for outbound connections, for certificate creation and certificate renewal.
- If you need to program your firewall to only allow access to specific IP addresses, contact Support for the current addresses that the LiveVault service uses.
Note:
The services on this appliance need access to the LiveVault Web Service on HTTPS: (Port 443) connections for configuration and updates. If your site has a Web Proxy service that requires authentication, you might have to configure the proxy to grant Web access to the appliance without authentication.
Plug in the appliance
To connect your appliance to the network,
- Plug in the appliance and press the power button.
- Wait approximately 30 seconds for the appliance to start.
Determining the TRA network address
You access the appliance configuration options through the TurboRestore Appliance Management Console, a browser based management application. To use the Appliance Management Console, you will need to determine the appliance's IP address within your network. If you have a DHCP network, you can obtain the LiveVault Locator (LVLocator.exe) utility to scan the network and assist you in determining the IP address of the appliance.
Download LVLocator
The LiveVault Locator utility is available from the LiveVault Web Management Portal.
To download LVLocator
- Log in to the LiveVault Web Management Portal.
- In the upper right corner, click Downloads.
The Downloads page opens.
- Select the Utilities tab.
The DOWNLOADS Utilities page opens.
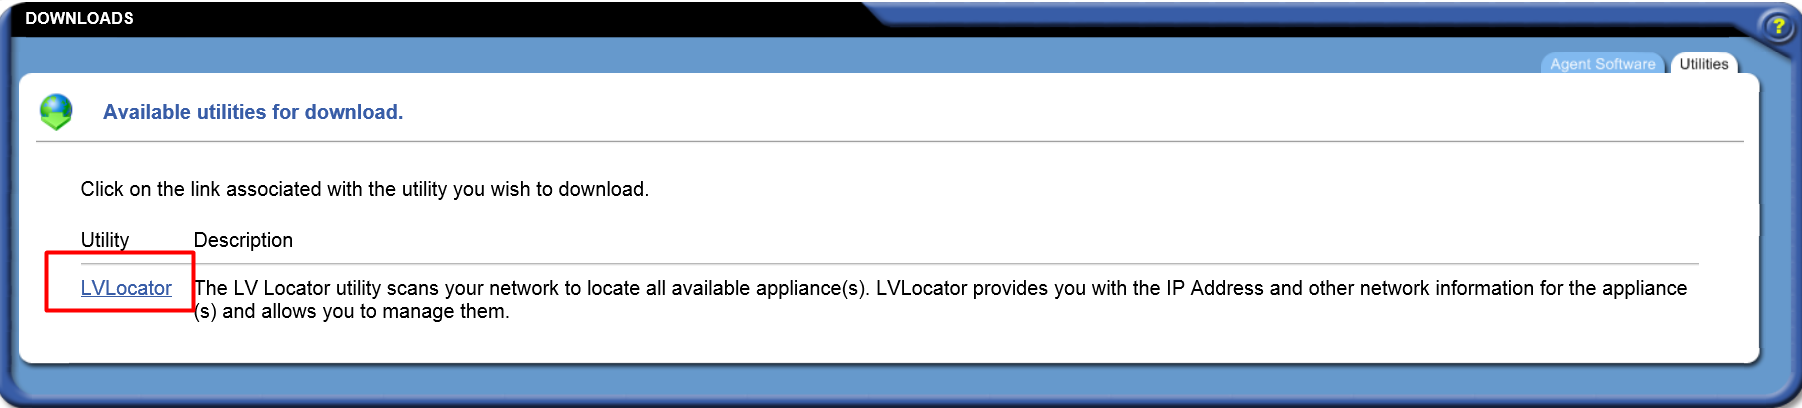
- Click the LVLocator link.
- To download the LVLocator.exe kit, click Save and specify a location for download.
The LVLocator.exe kit downloads.
- Double-click LVLocator.exe, and click Run.
- Specify a directory into which to extract the files.
- Click Extract.
The files are extracted to the selected directory.
Identify the TRA network address
To identify the TRA network address, use the LVLocator utility. To run LVLocator,
- Double-click the unzipped LVLocator.exe file.
LVLocator opens, then scans your network and locates the available appliances. The System List displays all available appliances within the subnet.
- If the appliance appears in the list, select it and click Goto…
The TurboRestore Appliance Management User Interface opens.
- To continue to set up that appliance, proceed to Provisioning the TRA to the LiveVault service.
- If the appliance does not appear in the list then proceed as follows.
- If no appliances appear in the System List, verify that the appliance is plugged in and turned on, that the Ethernet connection is working, and that your desktop computer and the appliance on are on the same network subnet.
- If your appliance is in a different subnet, you might have to manually enter an IP range to search for it. To do this, proceed as follows,
i.Click IP Range.
ii.Enter an IP range for LVLocator to search.
Assign an IP address to the TRA
On non-DHCP networks, you can use the netsh utility to assign an IP address to the appliance. If you have a non-DHCP network then proceed as follows,
- Contact Cloud Direct for appliance login credentials.
- On the appliance, plug in a keyboard, mouse and monitor.
- Log into the appliance with the credentials provided by Cloud Direct.
Use netsh to set your IP address
- Use the netsh utility to set the IP address from the command-line.
For example, enter the following command:
netsh interface ip set address "Local Area Connection" static 10.10.5.123 255.255.255.0 10.10.5.1 1
where
- 10.10.5.123 is the IP address.
- 255.255.255.0 is the Network mask.
- 10.10.5.1 is the Gateway.
- 1 is the Metric.
- To set the DNS from the command-line, enter the following command:
netsh interface ip set dns "Local Area Connection" static 10.5.3.42 primary
where
- 10.5.3.42 is the address of your primary DNS.
Note:
For additional command-line options for configuring network settings on the Windows 2008 R2 Core edition TurboRestore Appliance, see your Microsoft documentation.
Provisioning the TRA to the LiveVault service
You provision an appliance to connect it to the LiveVault service and obtain the necessary certificates and keys.
To provision the appliance, then, from the LVLocator,
- Click Goto... or copy the URL from LVLocator into a browser.
For example: http://10.10.5.23
The TurboRestore Appliance Management User Interface opens.
- Click Continue.
- Verify that the time and time zone on the page are appropriate for your area. To adjust them, click Change Time and use the calendar tool.
- To change the appliance name, enter a name in the TurboRestore name field.
- Enter your Login Name and Password as you would for the LiveVault service.
- Click Configure.
The appliance attempts to connect to the LiveVault service to obtain a certificate. This can take up to five minutes to complete.
- If you receive a "Failed to connect" or other error, then the appliance cannot connect to the LiveVault service.
- Click the Proxy Settings link and click Test.
If the test works, then the next provisioning attempt should work. If the test fails, then you must edit your network settings to allow access through your Proxy or firewall.
After the appliance obtains a certificate, the page indicates that the appliance is operating. At this point, the appliance is ready to receive data.
Configuring backup to the TRA
When you install new LiveVault agent computers, you can set them to back up to the TRA. Computers that already use the service must have the configuration changed to instruct them to use the TRA.
To configure computers to use the TRA,
- Log in to the LiveVault Web Management Portal.
- Select each computer configured for backup. Select the Properties tab, and then click Edit Properties.
The Edit Properties page opens.
- From the Appliance list, select an appliance.
The LiveVault agent is now ready to back up this computer's data to the TRA. The TRA then replicates to the vault.
Performing an initial backup to the TRA
For more information about backup policy size considerations, see Cloud Direct Quickstart.
To create an initial backup policy on new computers,
- Select the computer that you want to back up, and then select the Backup tab.
The Configure New Computer Wizard opens.
- Select a Service Plan from the list of available plans. If only one plan is available for this computer, it will be listed here, but you cannot change it.
- From the Use Backup Appliance list, select the appliance that you want to use.
- Click Configure Backup.
The Selection page opens.
- Select the files that you want to back up. Or, alternatively, define file selection inclusion and exclusion rules with the Advanced rules editor.
- Select the Schedule tab.
- In the When should the data be backed up to the TurboRestore Appliance? Option, select a schedule that best serves your needs.
Note:
If the backups occur more than once per day, and the appliance replicates to offsite on a schedule, then this almost guarantees that the appliance will resend previously replicated backups. The appliance may start replicating a full baseline backup every time it replicates, resulting in very few offsite backups.
- Select the Options tab and then select a retention schedule from the available items.
- Click Next.
The Backup Configuration Summary page opens.
- Review the summary and, if required, repeat Steps 1-10 for any additional backup policies needed.
- Click Done.
Performing incremental backups to the TRA
After the initial backup has finished, incremental backups occur according to the schedule that you configured.
Recovering the TRA
If the drives containing the operating system fail, then contact Cloud Direct who will arrange to have the TRA replaced.
