
Creating a restore file
The LiveVault Portal guides you through the restore process, including the following tasks.
- Selecting files to be restored, from selected computers.
- Selecting the backup version by date and time.
- Specifying whether to deliver the data over the Internet or on a restore device (TRA).
- Specifying the restore options for controlling the destination of the restored files, to, for example, a different system or directory.
- Specifying file handling options for replacing existing files at the destination.
- For Windows, restoring the original Windows System State.
The restore job starts automatically after you submit your restore request.
General restore considerations
As a user for your company account, you can view restore request status and details. When a restore is complete, you will receive an email indicating that your restore succeeded. LiveVault does not restrict the number of files you can restore within a single restore job. However, consider the following attributes of a restore job when you request one:
- It restores as of a single point in time.
- It restores files to their original locations, unless you redirect them to a different location.
- It uses a single, configurable method for resolving file name conflicts in the restored files destination. For example, use an option to rename or always overwrite conflicting files.
- It restores selected files.
- A restore job may include data stored on more than one vault, so you may see multiple restore jobs listed from a single restore request. The jobs will be given the name you specified, appended with a sequence number.
File system restore considerations
Cloud Direct recommends that you restore data to the same file system that was originally backed up.
For example, if you backed up data from a volume formatted with the Resilient File System (ReFS), then restore the data to a ReFS volume. If you restore files to a differently formatted file system volume, such as NTFS, then some file system-specific file properties are lost, such as security-extended attributes and alternate data streams. Losing data streams creates a risk of data loss.
Time-slice restore
The LiveVault Portal Time-slice restore feature lets you restore historic file versions. With the Time-slice restore feature, you specify a policy and a date and time, and the system displays a tree view of the policy's most current directories and files that were in the protected server as of that point in time. You browse the tree view of the directories and files, and select the files to restore.
LiveVault restores the latest version of each selected file that was stored as of that date and time.
Monitor restore jobs
You can monitor the progress of restore jobs in the LiveVault Portal.
The Summary and Restore tabs on the Home page provide details about all restore jobs for a specific computer, including the following information:
- Pending restore jobs, with scheduled start date and destination location.
- Running restore jobs, with progress, date started, and size of job.
- Completed restore jobs, with details for jobs completed within the last 48 hours.
When a restore job completes, you will receive an email indicating that the job is done.
Restore log reports
LiveVault logs the following items for every restore job, which you can view on the Reports tab:
- Restore request details, including files selected and options.
- The number of restored files/directories included in the restore.
- The time it took to process the restore.
- Detailed warnings and errors that occurred during the restore job.
Restoring a standard policy
The Restore Wizard guides you through requesting a restore. You can restore files over the Internet or have a restore device sent to you. After you determine the restore method, select files and options on the Restore Request page.
To restore data from a standard backup policy, proceed as follows.
From the LiveVault Welcome! Home page,
- Select the Restore tab.
The Restore page opens, and displays any previously submitted restore requests.
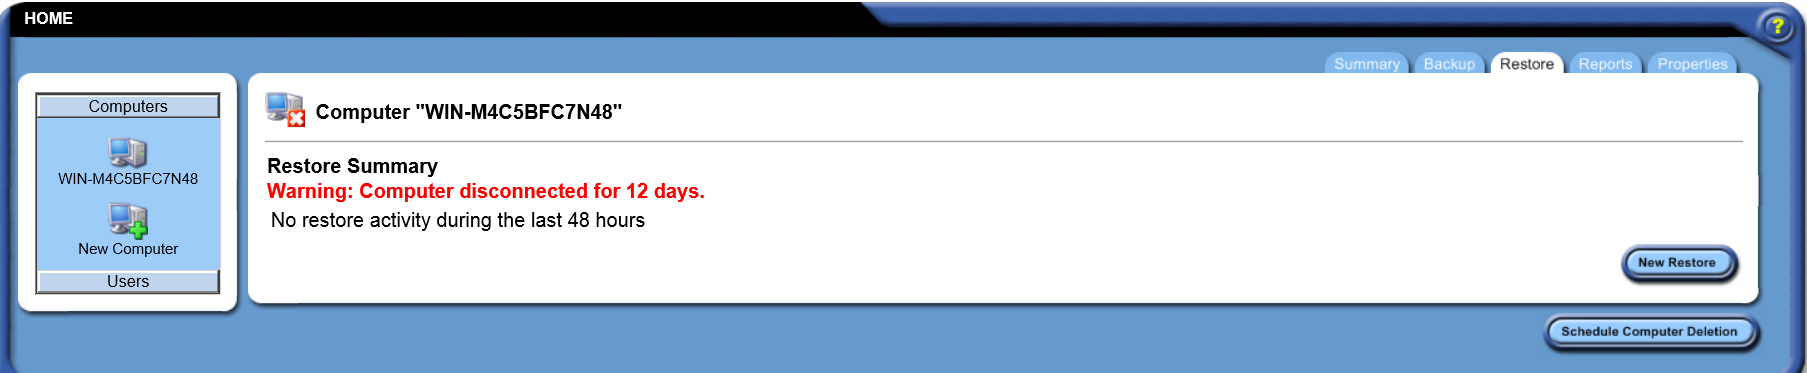
- Click New Restore.
The Restore Wizard page opens.
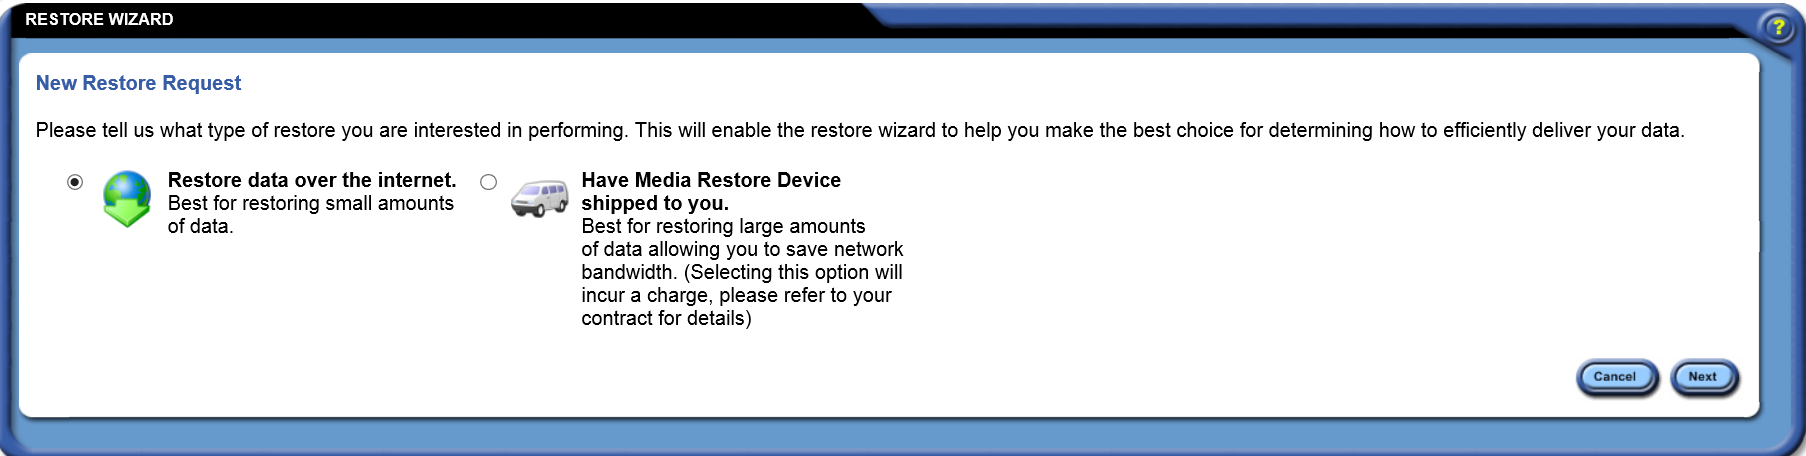
- Select one of the following two options:
- Restore data over the Internet.
The Restore Request page opens, letting you select the files you want to restore over the Internet.
- Restore data over the Internet.
or
- Have Media Restore Device shipped to you.
The system displays a page for you to select the version of data to restore, and the shipping method. When you click Next, the Restore Wizard Shipping Information page opens, requesting the address for shipment of the restore device. When the restore device arrives, you attach it to your network. You can then restore the backed-up files.
- The Restore Request page has two tabs: Enter details in the fields in these tabs as required.
- The Selection tab lets you browse to select the directories and files you want to restore. Alternatively, click Advanced to use rules as filters for directory and file selection.

- The Options tab lets you handle file overwrite situations, restore to a different computer than the files were backed up from, specify System State Restore, and schedule the restore.
- Click Next .
The Restore Wizard Confirmation page opens.
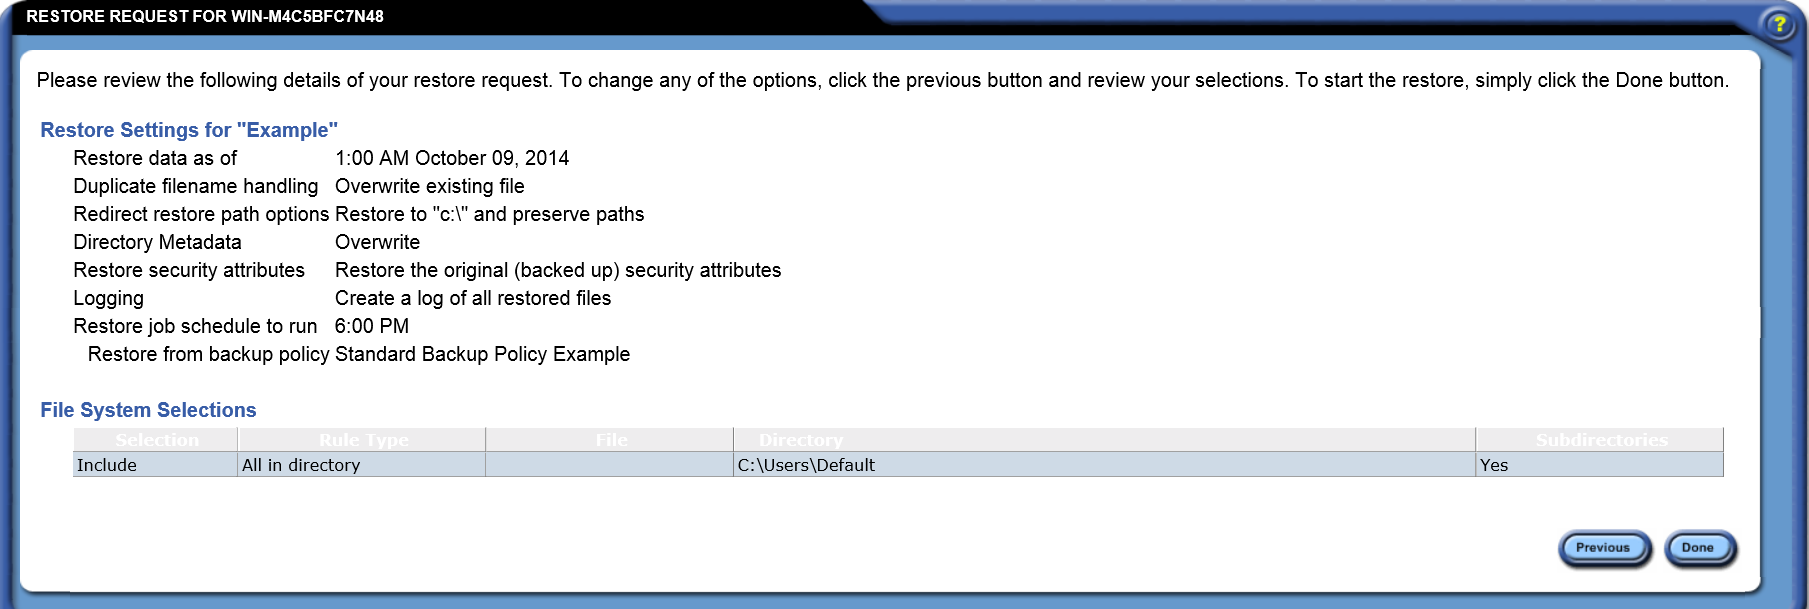
- Review the information.
- Click Done.
Restore request: Selection tab
Use the Selection tab to perform the following actions:
- Name the restore job.
- Specify the backup policy that includes the files you want to restore.
- Specify the backup version to restore by date and time of the backup.
- Specify the files and directories to restore.
- Restore the System State of the computer. Applies only to Windows.
- Rebuild the Windows Server 2012 deduplicated volumes. Applies only to Windows Server 2012 deduplicated volumes.
You specify which files to restore in two ways.
- You can browse and select the files from a tree view of the file structure, or
- You can define the file selection rules.
If you want to define specific file selection rules, then click Advanced.
File versions that can be restored
You can restore current or historic versions of backed up files and directories that fall within the data retention period as specified in your service agreement. The historical versions of files and directories you can choose from depends upon how often the policy is backed up and when the data was last changed. Files that were deleted from your computer can be restored if the policy they were part of was backed up, and a historical version containing those files is within your data retention period.
Field and button descriptions
|
Field/Button |
Description |
|
Name to Use for this Restore Request |
Type a name for the restore job. This can include any letters, numbers, or symbols, to a maximum of 229 characters. This name does not have to be unique. You can reuse names for restore jobs. However, choose a name that will help you identify the restore job. |
|
Policy Filter |
Select from the list of policies for your computer, or leave the All Policies default. If you select an individual policy, you can restore only the files backed up on that policy. |
|
Version |
Select the versions of your files and directories according to date and time. The backup versions in this menu include every version of the selected policy that was backed up, within your data retention period. In the tree view, you will see the data that was backed up as of the selected time and date. You will restore the latest version of each selected file and directory that was in the backup server as of this time and date. |
|
Directory Tree (on the left) |
Click in the directory tree to navigate through the volumes (file systems) and directories of your computer:
|
|
Selection Pane (on the right) |
View and select the directories and files to restore. You can also clear the directories and files to exclude them from the restore. The items in the selection pane are contained in the item (that is, volume (file system) or directory) selected in the directory tree. For each file displayed, the size and modified date are shown. Important: The modified date reflects when the file was last closed. This might not reflect the last time you modified the file (or the "modified" date you see on for the file on the Agent computer itself) nor how current the backed-up version is. For example, some database files will remain open for long periods of time (for example, weeks), yet during that time transactions have been committed to the database and LiveVault has backed up those transactions and has at least one good historic copy each day. In addition, some applications keep files open on the Agent and as a result the modified date in the LiveVault Portal will not reflect the actual last modified date you expect.
The icon preceding an item indicates whether the item is included or excluded from this restore:
To select a file or an entire directory to restore, click on the blank or half-filled icon preceding it in the selection list box. When you select a directory to restore, all its subdirectories and files are restored unless you specifically exclude them. To exclude a file or directory, click on the full or half-filled icon preceding it in the selection list box. |
|
Restore System State |
Windows only. Select to restore the computer's System State. By default, this option is not selected. Important: Restore the System State only if you need it for the databases you are restoring. |
|
Rebuild deduplicated volume |
Windows 2012 volumes optimized for data deduplication only. Select to rebuild one or more Windows 2012 volumes as optimized. Important: The destination volume for a deduplicated volume rebuild must be a newly-created, formatted volume with the same drive letter as the original. Do not enable deduplication on the destination volume. |
|
Advanced |
Click to open the Restore Configuration page, from which you can define file selection rules. |
|
Previous |
Click to return to the previous page. The restore configuration is not saved. |
|
Next |
Click to save the restore job. |
 Some - Indicates some files in the directories are selected and will be restored.
 All - Indicates the files or entire directories are selected and will be restored.
 Deduplicated Volume - Indicates a volume on Windows Server 2012 optimized for data deduplication.
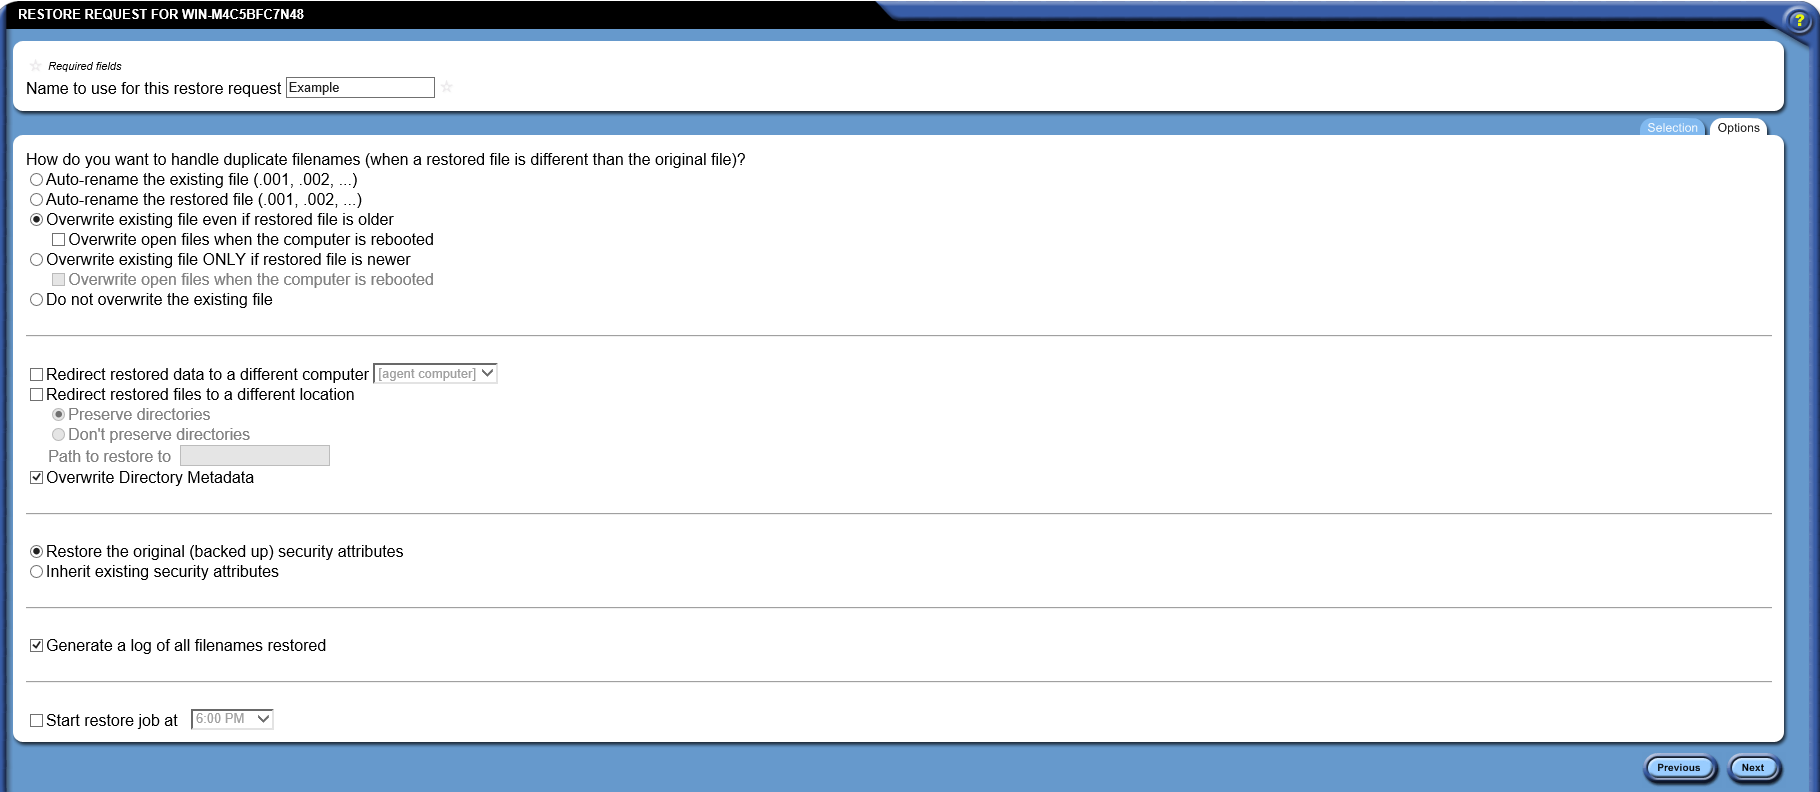
Restore request configuration: Options tab
Use the Options tab to specify the options that you want to use to restore your data over the Internet. You can perform the following actions:
- Specify how you want to handle situations in which a file being restored to a directory has the same name as a different file in that directory.
- Restore data to a different computer than the one from which it was backed up.
- Specify whether to restore the backed up security information.
- Specify when you want the restore job to begin.
- Name the restore job.
- Save the new restore job.
Field and button descriptions
|
Field/Button |
Description |
|
Name to Use for this Restore Request |
Type a name for the restore job. This can include any letters, numbers, or symbols, to a maximum of 229 characters. This name does not have to be unique. You can reuse names for restore jobs. However, you should choose a name that will help you identify the restore job. |
|
How do you want to handle duplicate filenames (when a restored file is different than the original file)? |
|
|
Auto-Rename the Existing File |
Select to rename the existing file on your computer and preserve the restored filename, if there is a filename conflict. An extension (in sequence) of .001, .002, etc. is appended to the existing file. For example, the existing file MyFile.docis renamed to MyFile.doc.001, and the restored file would have the name MyFile.doc. LiveVault uses this method to resolve filename conflicts by default, unless you select a different method. You must have sufficient disk space for both copies of each file. If you do not have sufficient space, the restore will fail. |
|
Auto-Rename the Restored File |
Select to rename the restored file and preserve the existing filename on your computer, if there is a filename conflict. An extension (in sequence) of .001, .002, etc. is appended to the restored file. For example, the restored file MyFile.docis renamed to MyFile.doc.001, and the existing file has the name MyFile.doc. You must have sufficient disk space for both copies of each file. If you do not have sufficient space, the restore will fail. |
|
Always Overwrite Existing File with Restored File |
Select to always overwrite the existing file on your computer with the restored file if there is a filename conflict. If the file is open when you process the restore, you can specify that you want to overwrite the open file when your computer is restarted by selecting the Overwrite open files when the computer is rebooted check box. After you overwrite a file you cannot retrieve it except by restoring another version. |
|
Overwrite Existing Files Only If Restored File is Newer |
Select to compare the existing and restored files if there is a filename conflict, and to do the following:
If the file is open when you process the restore, you can specify that you want to overwrite the open file when your computer restarts by selecting Overwrite open files when the computer is rebooted. |
|
Do Not Overwrite the Existing File |
Select to always discard the restored file if there is a filename conflict with an existing file on your computer. The existing file is always kept. |
|
Restore to Different Computer Options |
|
|
Restore Data to the Computer |
Select to restore the data to a different computer, instead of to the computer where the data was originally. The menu lists the agent computers on your network. Select the computer to restore data to. |
|
Redirect Restored Files to a Different Location |
Select to restore the data to a different location on your computer, instead of to the path where the data was originally. If you selected Rebuild deduplicated volume for a Windows Server 2012 deduplicated volume, this option is not available. Caution: If you are redirecting restored data from a Windows Server 2012 or 2012 R2 volume optimized for data deduplication, the target computer must have the same operating system and service pack level as the original computer. Differences in the deduplication writer may cause redirected restores to fail. |
|
Preserve Directories |
Select to restore the entire directory structure of the restored files into the directory specified in the Path to restore to box. This will include the full parent path name from the root as well as all of the selected subdirectories. If you selected Rebuild deduplicated volume for a Windows Server 2012 deduplicated volume, this option is not available. |
|
Do Not Preserve Directories |
Select to restore all the selected files directly into the directory specified in the Path to restore to box, regardless of their original placement in subdirectories. All the restored files are placed in the specified directory without their old directory structure. If you selected Rebuild deduplicated volume for a Windows Server 2012 deduplicated volume, this option is not available. |
|
Path to Restore to |
Type the full path to which you want to restore the files on your computer. For example, if you want the directory structure to be inserted below the root, type C:\ (or / for Linux). You must restore files to local fixed drives on a computer. LiveVault does not support restores to mapped network drives. If you selected Rebuild deduplicated volume for a Windows Server 2012 deduplicated volume, this option is not available. |
|
Overwrite Directory Metadata |
Select to overwrite directory metadata, such as directory attributes and security, with the metadata from the backed up data. Clear to use the default directory metadata for the restore location. |
|
Security Options |
|
|
Restore the Original Backup Security Attributes |
Select to restore the original security descriptors with the restored files and directories. |
|
Inherit Existing Security Attributes |
Select to skip restoring the security information with the restored files. Instead, the default security information set for the restore location will be used. This option is for Windows only. |
|
Generate a Log of All Filenames Restored |
Select to generate a log of filenames restored as part of the restore job. This log file is written to the agent computer. To find the path name for the file, go to the agent computer's Reports tab and generate a Restore Log Report. |
|
Start Restore Job At |
Select the time to start the restore job. By default, a restore job starts as soon as you request it. |
|
Previous |
Click to discard your restore request. |
|
Next |
Click to save the restore job. |
