


Installing Attix5 Pro SE client software for Windows
Attix5 Electronic On-line Vaulting provides internet-based electronic vaulting for the scheduled backup of customer-selected data and the restore or recovery of that data upon request. The Attix5 software client may be installed on the following platforms:
- Windows PC
- Windows Server
- Mac
- Unix and Linux
This article guides you through the procedure to install Attix5 Pro Server Edition (SE) for Microsoft Windows.
Prerequisites
Before commencing this task, it is assumed that you have downloaded the Attix5 client software to your desktop. If this is not the case, you can download the agent software by clicking this link.
Pre-install checklist
A pre-install checklist helps to ensure your installation goes smoothly. The following pre-install checklist is recommended by Cloud Direct prior to Attix5 installation.
- I am running a compliant operating system and meet the minimum requirements (see System requirements for details).
- I have checked available internet bandwidth, and times of day constraints, and considered the amount of daily data change and possible impact on the network user community.
- I have made the necessary amendments to my network infrastructure (see Network Requirements for details).
- I know what I want to back up, the location and how often.
- I have the relevant permissions to allow access to all data that I wish to protect, and can create a User Backup Account with full access.
- I have sufficient disk space for the backup software to run correctly – this can be as high as 1.5x data to be protected (see Disk space for details).
- I know what password and encryption key I should use to protect my data, and it is safely guarded.
Caution:
Cloud Direct have no access to these details, and without them it will not be possible to re-install the account or recover data in a disaster recovery scenario.
- I have discussed my backup requirements with Cloud Direct's Sales Team and have the necessary optional Plug-ins to protect my data and associated applications.
- I have read the Attix5 Pro Windows Server Edition (SE) user manual.
If you require assistance please call the Cloud Direct Support on 0800 368 1831. You will be asked to confirm that you are aware of the pre-install checklist items detailed above.
System requirements
The following table lists system requirements for the Storage Platform.
|
System |
|
Requirement |
|
Operating system |
Windows |
Windows Server 2012 (incl. R2 with update 2919394 - http://support.microsoft.com/kb/2919394) - 64-bit only. |
|
Database |
|
MS SQL 2012 or later. |
|
Processor |
Windows |
Minimum: 1.4 GHz (x64). Recommended: 2 GHz or faster. |
|
Memory |
|
AccountServer: Minimum 4 GB (over and above OS and SQL requirements). |
|
Hard disk space and configuration |
|
Required (StorageServer): Note: |
|
Other |
Application integration |
Not applicable. |
|
Account edition |
DL and SE Accounts from v6. |
|
|
Runtime |
NET 4.7.2 or later - 64-bit. |
|
|
Network |
A network interface card or a virtual network adapter with a fixed IP address, host name or DNS name is preferred for flexibility. Connection to Storage Platform requires port 8443 open for TCP/IP outbound traffic. Remote Management requires port 9091 open for TCP/IP. Adequate internet connectivity to service backup requirements. Valid NTP time source access and SMTP email requirements for system alerts and reporting. It is advisable to consult with Cloud Direct when planning new hardware for a Storage Platform installation.
|
Firewall / Antivirus compatibility
- All Attix5 Pro folders (backup and install) must be excluded from antivirus scans to avoid data corruption.
- Antivirus should be scheduled at a different time to backup.
Installing the Attix5 software
The SE MSI installer file contains pre-configured information to make installing Attix5 SE quick and easy.
Note:
The options available during the installation process depend on the settings enabled by the administrator when the MSI file was created. These options range from advanced install settings to specifying the install location.
Caution:
The default install path is: C:\Program Files\Backup Pro\Backup Client SE. You are strongly advised to use the default install path. If you choose a different folder location to install your Attix5 Pro SE client software then, when you come to uninstall, the program will delete ALL files in that chosen folder.
Caution:
If running antivirus software, please ensure that all Attix5 Pro folders are excluded from antivirus scans to avoid data corruption. Both antivirus software scans and backup processes are resource-intensive. It is advised not to run a backup and virus scan at the same time as this will significantly decrease machine performance. Windows will check whether you are running the MSI file suited to the installed operating system (i.e. 32-bit or 64-bit) and will not allow you to install the wrong version.
Installing Attix5 Pro SE
Caution:
If you attempt to install Attix5 Pro on a system that is not supported, then an error will be shown and the installation aborted. For the latest system requirements and compatibility information, please refer to the System Requirements.
To install the Attix5 Pro SE software, proceed as follows.
- Run the MSI file.
- In the Attix5 Pro SE Setup Wizard that appears, follow the steps as described below.
Attix5 Pro SE Setup Wizard
The Attix5 Pro SE Setup Wizard typically consists of five steps to guide you through the Setup task in a simple, step-by-step manner.
Note:
Some of the settings described below may have been removed when the MSI was created. Furthermore, the wizard may contain additional steps. Please read each window carefully before continuing. If you receive a Windows User Account Control message, asking you if you wish to allow the Attix5 Pro program to make changes to the computer, click Yes to proceed.
Step 1 of 5: Start the Attix5 Pro SE Setup Wizard
From the Attix5 Pro SE Setup Wizard window:
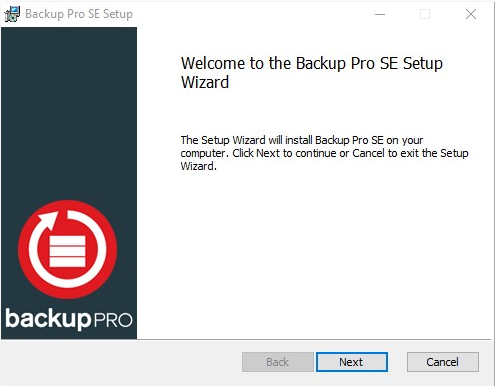
- Click Next.
The Service User Account window opens.
Step 2 of 5: Specify a User Account
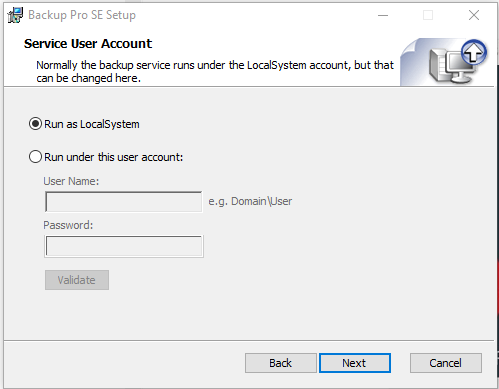
To enable the Backup Client to read all files that must be backed up, it may be necessary for the Backup Client service to run under a specific Windows account.
To specify which Windows account should run the backup service:
- Either,
- Select Run as LocalSystem,
or
- Run under a specific Windows user account:
i.Select Run under this user account.
ii.In the User Name box, type the Windows user name for the account.
iii.In the Password box, type the Windows user account password.
iv.Click the Validate button.
v.Wait for the Windows user account to be validated.
- Click Next.
Caution:
Please ensure that the user account specified in this step has full access to all files to be backed up. If files are included for backup that the account does not have access to, a "Some files were skipped" or "files skipped" error message will display in the backup logs.
The Destination Folder window opens.
Step 3 of 5: Specify an install location
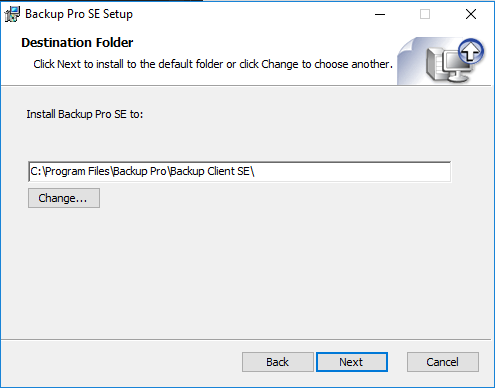
To specify a destination for the SE application files and folders:
- Either,
- Click Next to accept the default destination folder and continue to the next wizard step.
or
- Specify a new destination folder as follows:
i.Click the Change button.
ii.Browse to the folder.
iii.Click OK.
- Click Next to continue to the next wizard step.
The Ready to install Attix5 Pro SE window opens.
Caution:
Cloud Direct strongly recommend use of the default destination folder. However, if you decide to use another destination for the SE application files and folders, then you must create a new folder in which to install the client application files and folders.
Step 4 of 5: Begin the installation
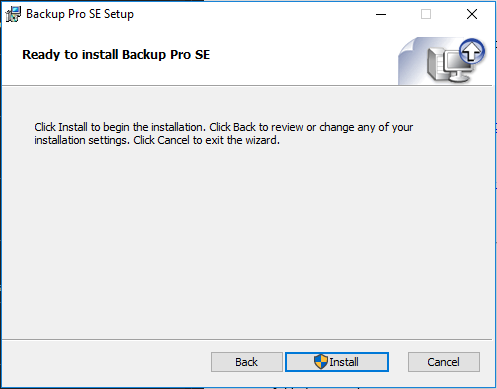
Once all the settings are configured, the wizard is ready to begin the installation.
To begin the SE installation:
- Click Install.
The install process begins. When complete, the Completed window appears.
Step 5 of 5: Exit the Attix5 Pro SE Setup Wizard
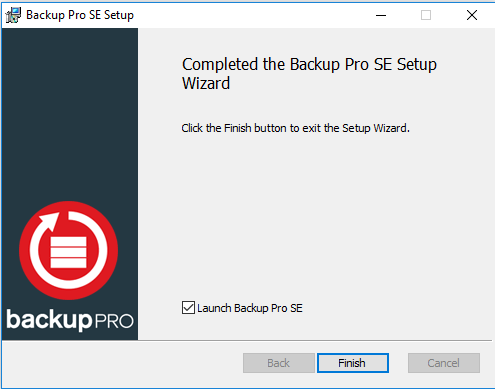
The last step of the wizard presents the option to launch the Backup Client.
Notes:
If the MSI file is being run from the same location as the plug-in installer file, the Setup Wizard will give you the option to launch the plug-in installer before launching the Client. Select the Launch Plug-in Installer check box to run it immediately after the Attix5 Pro SE Setup Wizard. For more information about plug-ins, please refer to the Attix5 Pro Plugin user manual. Before the Plug-in Installer launches, a User Account Control dialog box may appear, asking you if you wish to allow the Plug-in Installer to make changes to the computer. Click Yes to run the installer.
To launch the Backup Client immediately after the Attix5 Pro SE Setup Wizard:
- Ensure that the Launch Attix5 Pro SE check box is selected.
- Click Finish.
The Attix5 Pro SE client software is now successfully installed.
Notes:
If you selected the Launch Attix5 Pro SE check box in the last step of the Attix5 Pro SE Setup Wizard, the Backup Client will open automatically upon clicking Finish, and the Setup Wizard (which is the Backup Account Wizard and Backup Wizard combined) will launch, enabling you to create a Backup Account and configure your backup settings. Refer to, KB0010720, Creating an Attix5 backup account and schedule for further assistance.
Creating a Backup Account and configuring backup settings are beyond the scope of this article. If you opted not to launch the Backup Client immediately, then you can open the Backup Client interface at a later stage via the Start menu. When you open the Backup Client for the first time, the Setup Wizard will automatically launch.
Further information
For further information, please refer to articles in the Cloud Direct Knowledge Base or, alternatively, the Product User Manual, Attix5 Pro Windows Server Edition (SE) user manual.