Access and navigate the Attix5 Backup Client GUI
You can use the Attix5 Pro SE Backup Client Graphical User Interface (GUI) to:
- Select files for backup
- Launch backups
- Schedule automatic backups
- Find files in previous backups
- Restore files and folders from previous backups
Accessing the Backup Client GUI
To open the Backup Client GUI from an early version of Windows, then on the Start menu, point to All Programs, point to Attix5 Pro, and then click Backup Client SE.
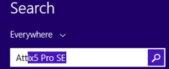
If using Windows 8.x then, from the Start screen,
- Enter Attix5 Pro SE in the Search box
- Click
 to return a list of search results.
 - In the list of returned results, click on
 to open the Backup Client.
Alternatively, if the Client interface is closed but the service is still running (if the  icon displays in the system tray), then double-click, or right-click, the icon in the system tray, and then click Open.
Note:
The first time you open the Backup Client, the Setup Wizard launches automatically.
Exiting the Backup Client GUI
To exit the Attix5 Backup Client GUI click on the  icon in the top right hand corner of the application window. The window closes but the application remains open on the system tray where the Attix5 icon remains visible. Scheduled backups will continue to be actioned.
Alternatively, to exit the Attix5 Backup Client GUI and close the application then, from the menu bar, select File > Exit. The application stops running and the Attix5 icon disappears from the system tray. In this closed state, scheduled backups will not occur.
Caution:
Because closing the application using File > Exit results in scheduled backups becoming inactive, then users are advised to exit the application by clicking the icon.
Navigating the Backup Client GUI
You can manage and monitor backups using the Backup Client application window, the system tray icon, or the notification bubbles that appear when certain processes occur. Below are descriptions of each of these items and the options they provide.
Application window
The Attix5 Backup Client application window contains the following areas:
- Menu bar
- Toolbar
- Tabs
- Help
- Status bar
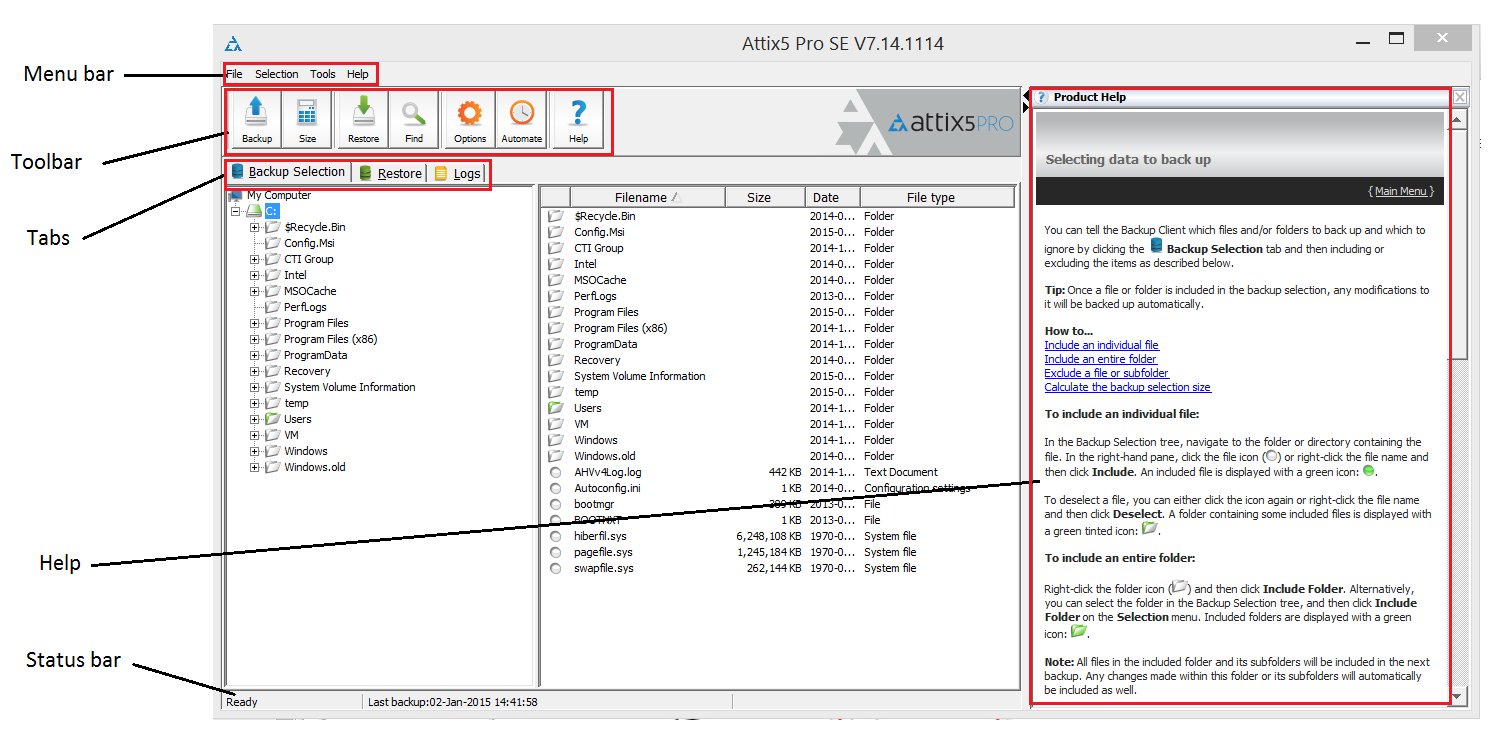
Menu bar and Toolbar buttons
All Backup Client functions can be performed from the menu bar. Shortcuts to the most commonly used menu bar functions are also available on the toolbar and via right-click menus. Each menu on the menu bar contains one or more options. The tables below describe the options available, including a column marked Toolbar button to identify the equivalent toolbar button icon.
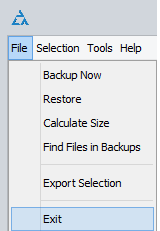
File menu
|
Option |
Click the option to… |
Toolbar button |
|
Backup |
Initiate a backup immediately. |
|
|
Restore |
Switch to the Restore view in the Backup Client. |
|
|
Calculate Size |
Determine the total size of the data included in the backup selection. |
|
|
Find Files in Backups |
Access the Find Files in Backups dialog box. This box enables you to search for particular files in your backups. |
|
|
Export Selection |
Export a list of all backup inclusions and exclusions to an html file for future reference. |
|
|
Exit |
Close the Backup Client application window. Note: |
|


Selection menu

|
Option |
Click the option to… |
|
Filters > New Filter |
Create a new filter to automate inclusions or exclusions based on file type |
|
Filters > Edit Filters |
Edit existing filters |
|
Filters > [filter, Eg Graphics] > Include |
Include all files in the selected folder that match the filter's criteria. |
|
Filters > [filter, Eg Graphics] > Exclude |
Exclude all files in the selected folder that match the filter's criteria. |
|
Filters > [filter, Eg Graphics] > Deselect |
Clear the selected folder of any filters currently applied to it. |
|
Include Folder |
Include the selected folder for backup. |
|
Exclude Folder |
Exclude the selected folder from the backup selection. |
|
Deselect Folder |
Clear the selected folder of any inclusions or exclusions. |
|
Refresh F5 |
Refresh the selection being displayed. |
Tools menu
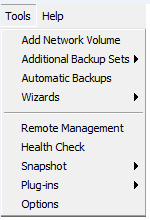
|
Option |
Click the option to… |
Toolbar button |
|
Add Network Volume |
Add a network volume. |
|
|
Additional Backup Sets > Add |
Create additional backup sets. This enables you to have separate backup selections that you can recover as separate sets of files. |
|
|
Additional Backup Sets > Manage |
Access the Backup Schedule page in the Options and Settings dialog box. Using the settings in this dialog box, you can manage the schedule(s) of your backup sets. |
|
|
Automatic Backups |
Access the Backup Schedule settings in the Options and Settings dialog box. Configure the settings in the Automatic Backups area to set up one or more automatic backups. |
|
|
Wizards > Account Wizard |
Launch the Account Wizard, which is a standalone wizard that enables you to change your Backup Account settings. |
|
|
Wizards > Backup Wizard |
Launch the Backup Wizard, which is a standalone wizard that enables you to configure your backup settings. |
|
|
Remote Management |
Access the Remote Management Settings dialog box. Using the settings available, you can enable Remote Management of the Client via the SP Console |
|
|
Health Check |
Access the Health Check dialog box. Performing a Health Check enables you to highlight possible issues. |
|
|
Snapshot > Export Backup Snapshot |
Access the Export Backup Snapshot dialog box, which enables you to configure the next backup to be a Snapshot backup to a specific location. |
|
|
Snapshot > Import Restore Snapshot |
Access the Import Backup Snapshot dialog box, which enables you to configure Restore Snapshot settings. |
|
|
Plug-ins > Email Notification |
Access the Email Notification settings dialog box, which you can use to enable/disable Email notification and configure its settings. |
|
|
Options |
Opens the Options and Settings dialog box that enables you to modify a range of Client settings. |
|

Help menu
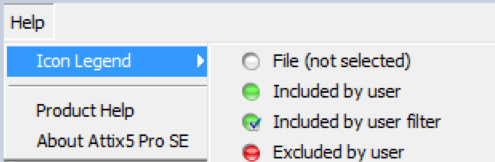
|
Option |
Click the option to… |
Toolbar button |
|
Icon Legend |
Access a list of the icons used in the Attix5 Pro Client and their meanings. |
|
|
Product Help |
Access the Product Help. As you navigate the Client, the Help pane will display information relevant to the selected tab. |
|
|
About Attix5 Pro SE |
Access the product information and support contact details. Also displays any plug-in version inconsistencies. |
|

Tabs
There are three tabs available in the Backup Client.

- Backup Selection: Displays the files and folders on the computer, enabling you to select the items to be backed up.
- Restore: Use this tab to browse previous backups and restore files and folders.
- Logs: Use this tab to view detailed information on each backup and restore.
Note:
In the right-hand pane on the Backup Selection and Restore tabs, you can click any of the column headings to sort the list according to their values.
Status bar
This area displays the date and time of the last backup performed by the system.

System tray icon
The System tray icon indicates the backup activity status and can be used to perform various tasks.
An animated icon indicates that the service is busy with a backup process.
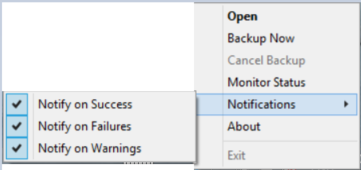
System tray icon menus
Click or right-click the system tray icon to view the menu options available.
Note:
On the Windows 7 operating system, the system tray icon is hidden by default. To display the icon, click the Show hidden icons arrow, click Customize. In the dialog box that appears, expand the Behaviours drop-down next to SERunner.exe, and then select Show icon and notifications.
|
Option |
Click the option to… |
|
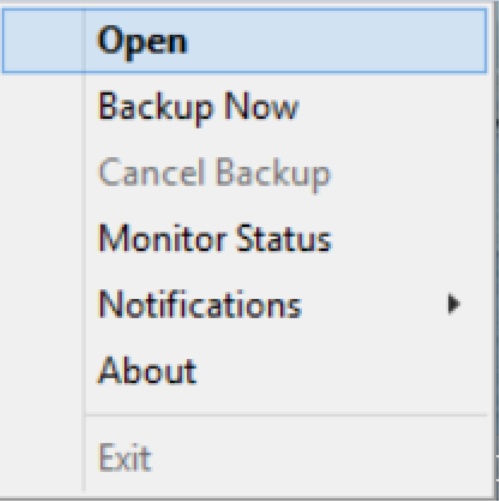
Open |
Opens the Attix5 Pro Backup Client application window. Users can also double-click the system tray icon to open the application window. |
|
Backup Now |
Manually initiates the backup process without opening the Backup Client application window. |
|
Cancel Backup |
If the service is busy with a backup (when the |
|
Monitor Status |
Opens a small window above the system tray displaying the progress of the current process. This enables you to monitor the status and progress of the task being performed without opening the application window.
|
|
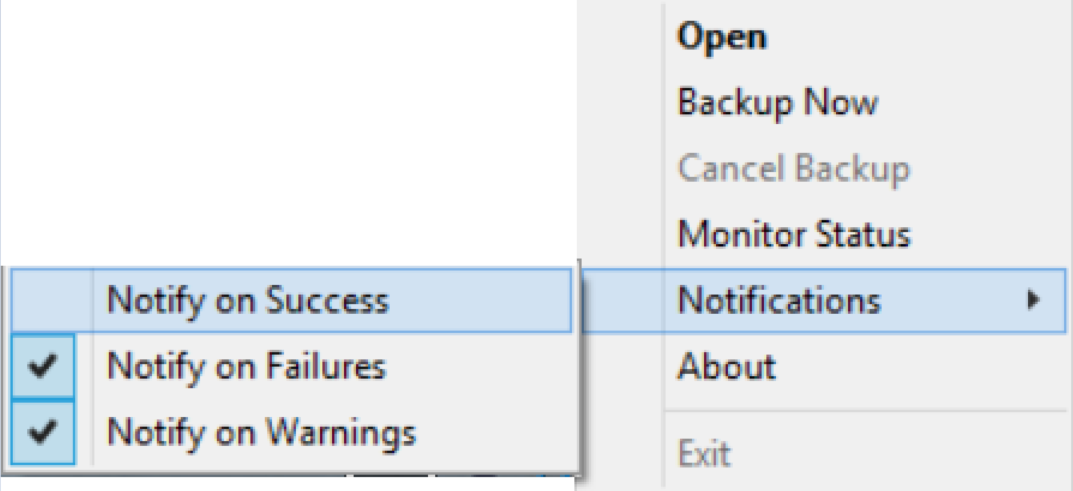
Notifications |
Provides you with options to enable/disable backup notifications. For more information, see "Notifications" later in this article. |
|
About |
Displays the splash screen. Click anywhere in the window to close it. |
|
Exit |
Removes the Note: To see the icon in the system tray again, simply open the Attix5 Pro Backup Client interface using the Windows Start button. |
Caution:
The backup service must be running at all times for backups (manual or scheduled) to take place.
Note:
To stop or start the Backup Service, open Administrative Tools in the Control Panel, and then double-click Services. In the list of services that appear, select Attix5 Pro SE and select Stop or Start on the toolbar. A red cross will appear in the corner of the system try icon when the service is not running.
Notifications
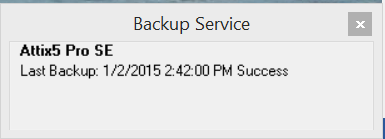
The system tray icon can display a number of notifications once a backup has completed. The following notifications are available:
- Backup successful (message displayed for 5 seconds)
- Backup successful with errors (message displayed for one minute)
- Backup failed (message displayed until you click it)
- Update successful (message displayed for 3 seconds)
When a notification is available, a pop-up will display information. If there were warnings or errors, the system tray icon will also flash a red cross.
Note:
To view related log file information, click anywhere within the pop-up.
Disabling notifications
Notifications are enabled by default but you can disable them individually by right-clicking the system tray icon and then clearing the check mark next to the relevant Notifications option. The example below shows Notify on Success is now unchecked and therefore disabled.