
Troubleshooting SimplySecure uninstall issues on a Windows computer
The following information was compiled using source material from Beachhead created to resolve a customer issue.
If some components of the SimplySecure agent application cannot be removed under the normal removal procedure described in knowledge article, KB0011081, Uninstalling SimplySecure, then they may be removed by:
- Running a Microsoft utility to resolve any problems, followed by
- Reinstalling then removing the SimplySecure agent software.
This article describes how to run the Microsoft utility on the computer, and then how to reinstall and remove the SimplySecure agent software.
Prerequisites
Before beginning this task, you must have administrator access to the SimplySecure Administration Console.
Before removing the SimplySecure agent from a computer, first ensure that the computer is connected to the network and is able to communicate with the SimplySecure server.
Running the Microsoft utility
To run the Microsoft utility then, from the computer, proceed as follows.
- Click on the link to the utility, http://support2.microsoft.com/mats/program_install_and_uninstall
- Click, Run Now.
A download dialog box appears.
- Click, Run, to download and launch the tool.
- When the prompt appears, click on, Detect problems and let me select the fixes to apply.
- When you are asked if you have a problem installing or uninstalling, click, Uninstalling.
- Select, SimplySecure or, Data Encryption or, Beachhead, from the list of programs, then click, Next.
- Click, Yes, try to uninstall, then click, Next.
The tool will attempt to uninstall the SimplySecure agent software.
- When the, Troubleshooting is complete message appears on-screen, click, Next.
- Select, I don't know if the problem has been fixed, and click, Next.
- On the next screen, click, Cancel.
Reinstalling and then removing the SimplySecure agent software
When you are finished running the Microsoft utility, there will still be some pieces of the SimplySecure agent application remaining on the system. To complete the removal process you must now reinstall, and then remove, the SimplySecure agent software. This must be done on the SimplySecure server and on the computer. Proceed as follows.
Retiring the computer on the SimplySecure Server
First retire the computer on the SimplySecure server, before reinstalling.
- From your Windows browser, login to the SimplySecure Administration Console at https://console.beachheadsolutions.net/Administration/Administration.Accounts.aspx .
- On the SimplySecure Console main menu bar, select Manage Devices, then select Computers, and then, from the sub-menu, click Computers.
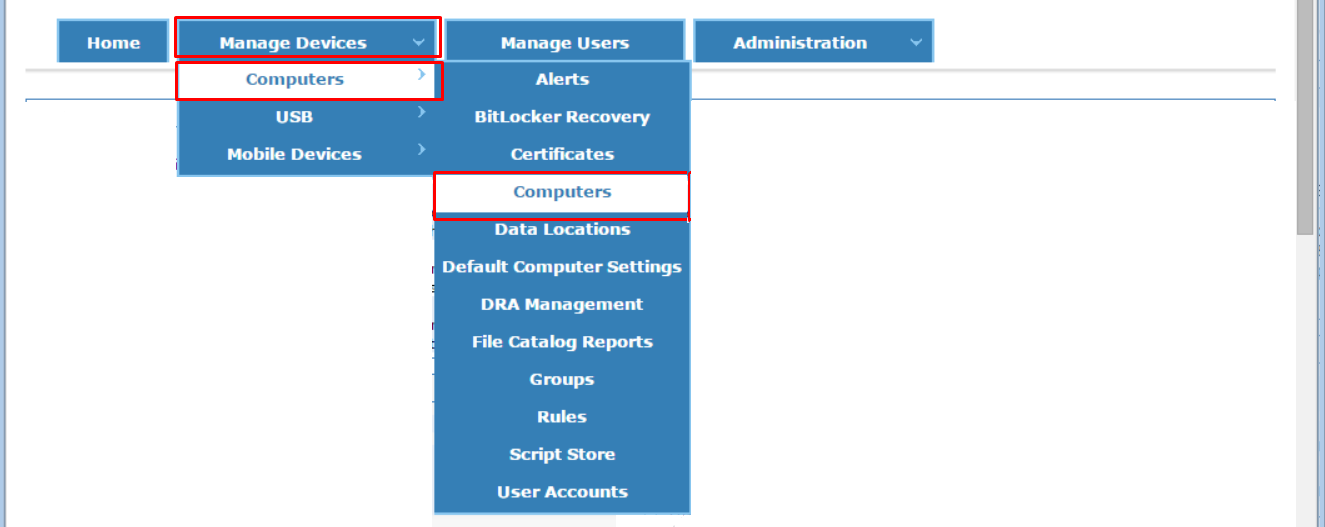
The Computer Listing page opens.
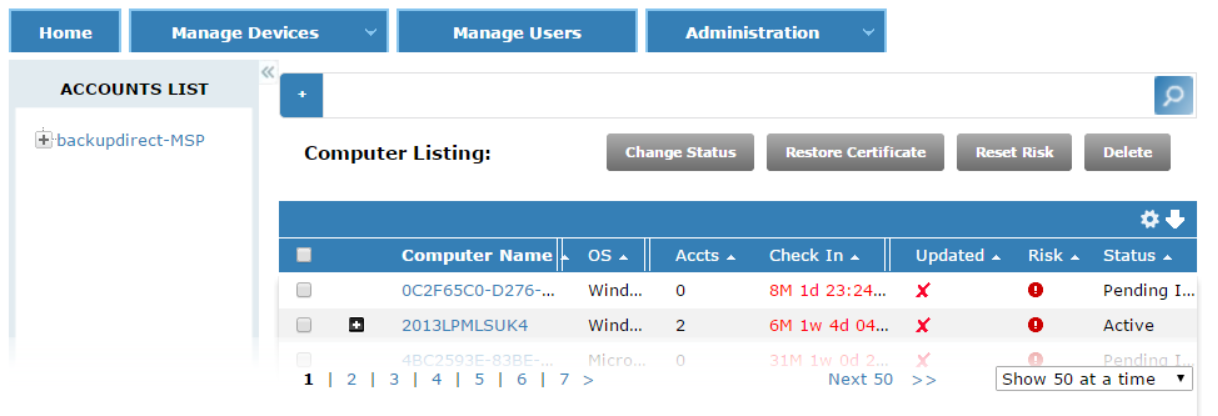
- In the list of computers, tick the checkbox for the computer you are troubleshooting.
Note:
You may need to use the left hand navigation pane to locate the appropriate user account before searching for the required computer in the list.
- In the grey menu bar above the Computer Listing, click the Change Status button.
The Change Status dialogue box appears.
- Select the Retired radio button, and click OK.
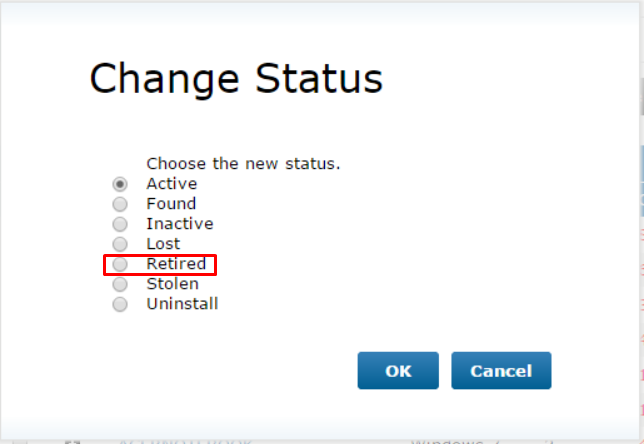
The computer is now Retired on the SimplySecure server. Leave the SimplySecure Administration Console and return to the computer to reinstall the SimplySecure agent.
Reinstalling the SimplySecure agent on the computer
- At the computer, reinstall the SimplySecure agent, using the latest version of the SimplySecure agent software.
Note:
If required, refer to knowledge article, KB0011074, Installing SimplySecure on a Windows or Mac computer.
- When the installation is complete, open the Task Manager and stop the following processes:
- MonitorConsole.exe
- NativeEventsService.exe
- UCSysconduit.exe
- UserConsole.exe
- Initcrypt.exe
The SimplySecure agent software is now reinstalled on the computer. Before removing from the computer, it must first be made Inactive at the SimplySecure server
Making the computer Inactive at the SimplySecure server
- At the SimplySecure Administration Console, on the Computer Listing page, tick the checkbox next to the name of the computer you're troubleshooting.
- Click the grey Change Status button.
The Change Status dialogue box appears.
- Select the Inactive radio button, and click OK.
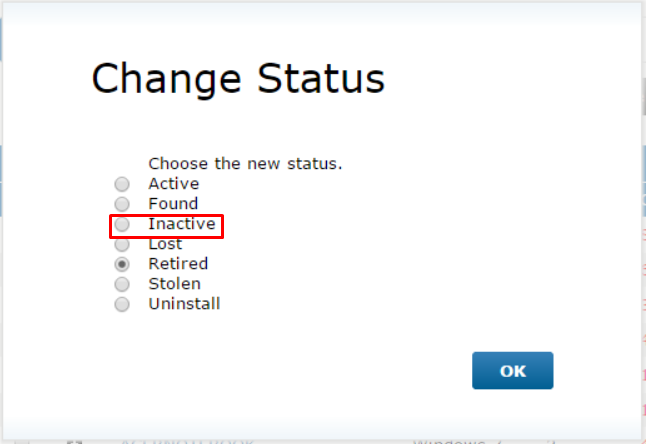
- Click, Save.
The SimplySecure agent is now Inactive at the server and the software may be removed from the computer.
Removing the SimplySecure agent from the computer
- Reboot the computer.
- Remove the SimplySecure agent software as normal, via the Windows Control Panel.
Note:
If required, refer to knowledge article, KB0011081, Uninstalling SimplySecure.
The SimplySecure agent software is now removed completely from the Windows computer.
