
Saving VSS shadow copies to another local drive
VSS (Volume Shadow Copy Service, or Volume Snapshot Service), is a technology included in Microsoft Windows that allows taking manual or automatic backup copies or snapshots of computer files or volumes. The VSS captures and copies stable images for backup on running systems, particularly servers, without unduly degrading the performance and stability of the services they provide.
By default, VSS shadow copies are saved onto the drive they are copying. However, you may want to save your VSS shadow copy to a different drive, perhaps one with greater capacity. This article describes how to change the designated drive for VSS shadow copies to another local drive.
Important Note:
As part of the Microsoft Windows server operating system, VSS is not a product provided by Cloud Direct. This article is intended as a first step to help resolve VSS related issues affecting Cloud Direct's backup service. However, should VSS-related problems persist then please contact your local IT Support.
Prerequisites
Before starting this task, please see related knowledge article, KB0011296, Checking and adjusting VSS thresholds.
Changing the destination directory for VSS
To save VSS shadow copies to a local drive other than the default drive, you must change the destination directory. Proceed as follows.
- With reference to knowledge article KB0011296, Checking and adjusting VSS thresholds (part 2, Clearing down VSS memory use), clear down the VSS memory use on the default drive.
- When the VSS memory use has been cleared, then, from the Shadow Copies page, select the drive, or Volume, where VSS is currently being saved to.
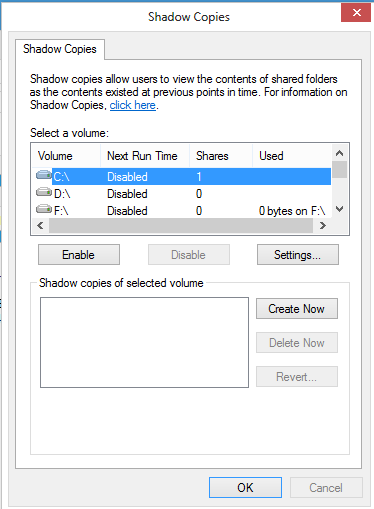
The Shadow Copies page lists all drives, or Volumes, on the server.
- Ensure that the selected drive has Next Run Time set to Disabled. (If not, then click the Disable button).
- Click the Settings button.
The Settings page, for the selected drive, opens.
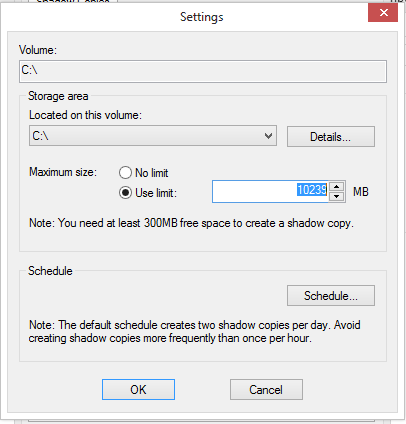
In the example shown, the Settings page shows that VSS shadow copies for Volume C:\, are saved to Storage area, volume C:\.
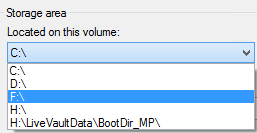
- Click the Located on this volume dropdown and, from the menu options, click on the new destination drive.
- Ensure that the Maximum size radio button is set to Use limit, then use the up/down arrows in the adjacent box to set the limit to between 15% and 20% of the new drive's total capacity.

This sets the maximum amount of memory space allocated to VSS use on this drive.
Important note:
A VSS threshold is set to limit the amount of disk space used by VSS. It is important to have this threshold set to a sensible limit (recommended at 15% to 20% of total drive capacity). If No limit is selected, then VSS will continue to use more and more of the available drive space until all drive space is used up, at which point applications start to fail due to insufficient drive space.
- Click OK.
The Shadow Copies page re-appears.
Note:
if you require Shadow Copies, then you must go back into the Schedule page and set up a new schedule.
- Click OK to leave the Shadow Copies page.
The destination drive has now been changed, and the new configuration saved. In the example shown, VSS shadow copies for drive C will no longer be saved on drive C, but will now be saved on drive F.
Note:
This action does not require a reboot in order to take effect.
